Gunslinger
New Member
- Joined
- Apr 11, 2012
- Messages
- 71
- Reaction score
- 0
I did this project the other day,and since I wanted to go back in and fix something I decided to take some pics and build a how-to thread.So here goes..
What you'll need:
1 small flat-head screwdriver
1 small philips-head screwdriver
1 torx driver or bit,size T-10
1 medium philips-head screwdriver
1 exacto knife
1 10mm socket( any size drive ) with a 6 inch extension and a ratchet
1 soldering iron with a fine tip (the tip I have is actually pointed,not the regular flat blade type ) and extra solder
1 pair needle nosed pliers
1 pair small tweezers for placing the LEDs( I used an exacto knife more than the tweezers )
1 small round file to open up the hole for the 4-way switch LED
I got the LED for the 4-way switch here- http://www.superbrightleds.com/cgi-bin/store/index.cgi?action=DispPage&Page2Disp=/instrument.html Select the NEO wedge series by clicking the "See prices and buy" link in the top listing. The LED I used is the Neox-xhp and the size you want is the 3MM ( T-1 ) in red.The hole in the circuit board will need some slight enlarging with a round needle file and the little locking tabs( the bump the red arrow is pointing to ) will need to be removed with an exacto knife.

I bought the LEDs for the radio circuit board here- http://www.oznium.com/1206-smd-led
The entire face is clear,so any color you like will work.You'll need 30 for the buttons,8 for the knob surround color,and 2 for the CD slot.BUY EXTRAS FOR EACH COLOR YOU USE !!!! They're cheap and since they're so small they're easy to accidentally burn.
The LEDs to change the clock color can be bought here- http://www.oznium.com/plcc-2
These are the same LEDs used to change the gauge cluster color as well as the steering wheel controls.You'll need 3,again,buy a couple extra.
On to the fun part !
Take out the HVAC controls by applying some upward pressure and sliding a small screwdriver into the gap and prying gently outward. Once the bottom comes out pull on the outer knobs and the whole panel will pop out.Then unplug the 2 plugs.

Next remove the 4 bolts that hold the radio in place.

Then pull outward and upward on the bottom edge of the radio.After it releases there are 5 plugs on the back of the radio plus the plug at the back of the clock.

After the radio is out,pull the knobs off the front ( they'll just pop off )then look at the side.You'll find one Torx screw ( red arrow,size T10 ) on each side just under the front panel and a few plastic tabs( blue arrow,they go all the way around the radio ). These are what hold the face on.

Once you get the face separated from the radio the back will look like this.Remove the 3 screws circled in red first,then set the black plastic piece they hold aside ( Don't forget to put it back on later like I did !! ).Then remove the screws circled in blue.The circuit board will now come off the faceplate. No need to keep the screws straight,they're all the same size.

The circuit board will look like this from the front.The LEDs circled in green are for the knob color.The LEDs circled in blue are for the button color.The LEDs circled in red are the small locator lights on the sides of the CD slot.The best way I found to remove these was to put the soldering iron on one end and GENTLY twist the LED with a pair of needle nosed pliers.The other side will generally separate. DO NOT FORCE IT IF IT DOESN'T WANT TO COME OFF.Just work at it a bit applying heat to both ends if it's stubborn.

Go slowly and remove one LED at a time . On the ends of the LEDs you'll notice that one side shows white at the ends,the other side shows green. THIS IS EXTREMELY IMPORTANT !! LEDs are polarized,that means that they only work when electricity flows through them the right way.I'll add a pic here to illustrate the difference. These LEDs are VERY SMALL and you may need a magnifying glass to check this.Green arrow=green end,white arrow=white end.

I didn't change the color of the LCD screens on my clock,gauges or the radio.I'll post up how in case you'd like to though.On the back of the radio circuit board there are small metal tabs that twist to hold the screen in place. These are circled in red. There is also one tab that is soldered through the board. This is circled in blue. Straighten the tabs so they'll slide though the holes in the board. Un-solder the tab circled in blue. I THINK at this point that you will be able to work those tabs through the board and bend the LCD screen up out of the way( maybe Jerez can chime in here to make sure I'm right ?If not,then you may have to remove the entire LCD assembly from the board ). There are more LEDs under the screen that need to be changed to change the display color.

On to the clock and nearby lighting.
Below the circuit board lies the clock and the lighting for the 4-way switch,the transponder key light( security light )and the passenger side airbag lights. To remove these start with the screw circled in red. Then slowly pry the tabs around the cream colored panel and pull. The 4 way switch kind of " snaps" into place,so this is a little tough to get apart.

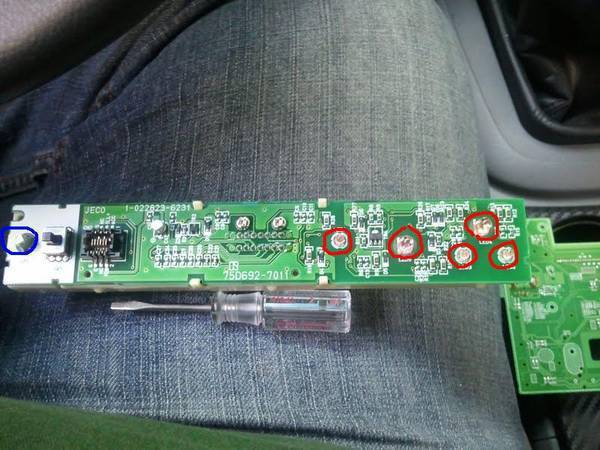
Once it comes apart the rear circuit board will separate from the front one ( don't worry,they just connect with a small plug).When you get that apart the face of the board will look like this. The LEDs circled in red are the lights for the passenger airbag and security light. The one circled in blue is for the 4-way switch .I bought a 3mm twist in LED from the link above for this. I used red so it would show through strongly.
Now for the actual clock LCD lighting.There will be one small circuit board left in the faceplate for the radio. It's the clock board and the LEDs for that will be on it. It's held in by 2 screws ( one on either end ).Once they're out the board will just fall out of the faceplate. The next step is to GENTLY pry up the LCD screen to remove it from the board. Use a small screwdriver ( again,GENTLY) and pry where the arrows are trying not to go past the clear part of the screen with the screwdriver.

After you get that out there is one small screw and a couple of obvious plastic clips that hold the plastic support for the LCD screen.Pull that off and you'll have access to the LEDs for the clock ( circled here in red ).These LEDs are a bit different from the radio LEDs as they don't use colored ends to show which way to install them. One corner has a little notch ( circled in red in the 2nd pic ) taken out of it.MAKE SURE THE NOTCH IS IN THE SAME POSITION AS THE STOCK LED YOU REMOVE.

Clock LED

Once you get these done reverse the steps to re-assemble and enjoy your new color !
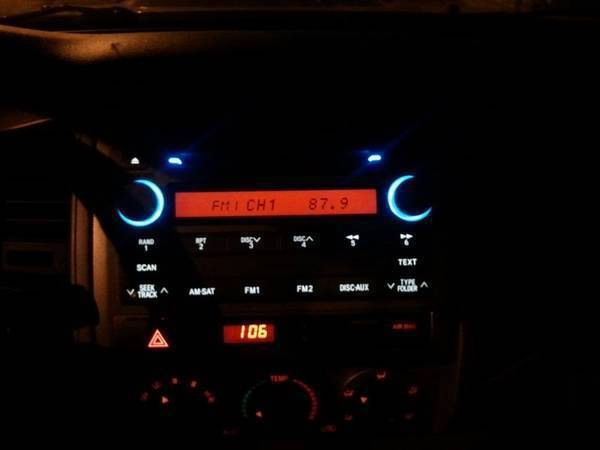
The finished product looks like this.I hope this will give some of you the info you need to do a great looking and satisfying mod !
What you'll need:
1 small flat-head screwdriver
1 small philips-head screwdriver
1 torx driver or bit,size T-10
1 medium philips-head screwdriver
1 exacto knife
1 10mm socket( any size drive ) with a 6 inch extension and a ratchet
1 soldering iron with a fine tip (the tip I have is actually pointed,not the regular flat blade type ) and extra solder
1 pair needle nosed pliers
1 pair small tweezers for placing the LEDs( I used an exacto knife more than the tweezers )
1 small round file to open up the hole for the 4-way switch LED
I got the LED for the 4-way switch here- http://www.superbrightleds.com/cgi-bin/store/index.cgi?action=DispPage&Page2Disp=/instrument.html Select the NEO wedge series by clicking the "See prices and buy" link in the top listing. The LED I used is the Neox-xhp and the size you want is the 3MM ( T-1 ) in red.The hole in the circuit board will need some slight enlarging with a round needle file and the little locking tabs( the bump the red arrow is pointing to ) will need to be removed with an exacto knife.
I bought the LEDs for the radio circuit board here- http://www.oznium.com/1206-smd-led
The entire face is clear,so any color you like will work.You'll need 30 for the buttons,8 for the knob surround color,and 2 for the CD slot.BUY EXTRAS FOR EACH COLOR YOU USE !!!! They're cheap and since they're so small they're easy to accidentally burn.
The LEDs to change the clock color can be bought here- http://www.oznium.com/plcc-2
These are the same LEDs used to change the gauge cluster color as well as the steering wheel controls.You'll need 3,again,buy a couple extra.
On to the fun part !
Take out the HVAC controls by applying some upward pressure and sliding a small screwdriver into the gap and prying gently outward. Once the bottom comes out pull on the outer knobs and the whole panel will pop out.Then unplug the 2 plugs.
Next remove the 4 bolts that hold the radio in place.
Then pull outward and upward on the bottom edge of the radio.After it releases there are 5 plugs on the back of the radio plus the plug at the back of the clock.
After the radio is out,pull the knobs off the front ( they'll just pop off )then look at the side.You'll find one Torx screw ( red arrow,size T10 ) on each side just under the front panel and a few plastic tabs( blue arrow,they go all the way around the radio ). These are what hold the face on.
Once you get the face separated from the radio the back will look like this.Remove the 3 screws circled in red first,then set the black plastic piece they hold aside ( Don't forget to put it back on later like I did !! ).Then remove the screws circled in blue.The circuit board will now come off the faceplate. No need to keep the screws straight,they're all the same size.
The circuit board will look like this from the front.The LEDs circled in green are for the knob color.The LEDs circled in blue are for the button color.The LEDs circled in red are the small locator lights on the sides of the CD slot.The best way I found to remove these was to put the soldering iron on one end and GENTLY twist the LED with a pair of needle nosed pliers.The other side will generally separate. DO NOT FORCE IT IF IT DOESN'T WANT TO COME OFF.Just work at it a bit applying heat to both ends if it's stubborn.
Go slowly and remove one LED at a time . On the ends of the LEDs you'll notice that one side shows white at the ends,the other side shows green. THIS IS EXTREMELY IMPORTANT !! LEDs are polarized,that means that they only work when electricity flows through them the right way.I'll add a pic here to illustrate the difference. These LEDs are VERY SMALL and you may need a magnifying glass to check this.Green arrow=green end,white arrow=white end.
I didn't change the color of the LCD screens on my clock,gauges or the radio.I'll post up how in case you'd like to though.On the back of the radio circuit board there are small metal tabs that twist to hold the screen in place. These are circled in red. There is also one tab that is soldered through the board. This is circled in blue. Straighten the tabs so they'll slide though the holes in the board. Un-solder the tab circled in blue. I THINK at this point that you will be able to work those tabs through the board and bend the LCD screen up out of the way( maybe Jerez can chime in here to make sure I'm right ?If not,then you may have to remove the entire LCD assembly from the board ). There are more LEDs under the screen that need to be changed to change the display color.
On to the clock and nearby lighting.
Below the circuit board lies the clock and the lighting for the 4-way switch,the transponder key light( security light )and the passenger side airbag lights. To remove these start with the screw circled in red. Then slowly pry the tabs around the cream colored panel and pull. The 4 way switch kind of " snaps" into place,so this is a little tough to get apart.
Once it comes apart the rear circuit board will separate from the front one ( don't worry,they just connect with a small plug).When you get that apart the face of the board will look like this. The LEDs circled in red are the lights for the passenger airbag and security light. The one circled in blue is for the 4-way switch .I bought a 3mm twist in LED from the link above for this. I used red so it would show through strongly.
Now for the actual clock LCD lighting.There will be one small circuit board left in the faceplate for the radio. It's the clock board and the LEDs for that will be on it. It's held in by 2 screws ( one on either end ).Once they're out the board will just fall out of the faceplate. The next step is to GENTLY pry up the LCD screen to remove it from the board. Use a small screwdriver ( again,GENTLY) and pry where the arrows are trying not to go past the clear part of the screen with the screwdriver.
After you get that out there is one small screw and a couple of obvious plastic clips that hold the plastic support for the LCD screen.Pull that off and you'll have access to the LEDs for the clock ( circled here in red ).These LEDs are a bit different from the radio LEDs as they don't use colored ends to show which way to install them. One corner has a little notch ( circled in red in the 2nd pic ) taken out of it.MAKE SURE THE NOTCH IS IN THE SAME POSITION AS THE STOCK LED YOU REMOVE.
Clock LED
Once you get these done reverse the steps to re-assemble and enjoy your new color !
The finished product looks like this.I hope this will give some of you the info you need to do a great looking and satisfying mod !