Welcome!

By registering with us, you'll be able to discuss, share and private message with other members of our community.

SignUp Now!

LED cluster NEEDLE colour change???'s

06 xrunner

New Member
Joined
Dec 21, 2012
Messages
556
Reaction score
0
Hey peeps

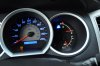
So I've changed the LEDs of the gauges and was gonna do the needles at the same time but didn't realize how many LEDs for the needles so had to order a few more.
I plan on doing a couple blue and a couple white I read that some people have removed the paint on needles and repainted them with the colour the LEDs are and some people have just removed the paint and left clear

Question is do I need to paint the needles again or just leave clear? and if need to paint do I paint them the same colour of the LEDs and do I just paint the under side or whole needle and what you peeps used to paint?

thanks

Edit:Hard to see in pic but tach and speedo are blue and want want white needles and gas and temp are white and want blue needles
 

Attachments

  • DSC_0264.jpg
    DSC_0264.jpg
    82.1 KB · Views: 110
  • DSC_0266.jpg
    DSC_0266.jpg
    82.8 KB · Views: 126
Last edited:

Torspd

Moderator
Staff member
Joined
May 25, 2008
Messages
14,814
Reaction score
54
I wish I could help. There are a few here that have that knowledge. Hopefully they will chime in soon.
 

1GRracer

"Pete"
Joined
Aug 8, 2010
Messages
3,586
Reaction score
2
You can use nail polish remover. The orange is just a stripe under the needle.
 

Xcars_onfireR

Member
Joined
Mar 21, 2012
Messages
242
Reaction score
0
I used sand paper to take off the orange and the ruff texture really made the blue from my leds show up really well
 

nick_gz1

Active Member
Joined
Oct 26, 2011
Messages
1,705
Reaction score
21
looks nice so far, i still need to get this done
 

TitanRattler813

Well-Known Member
Joined
Feb 28, 2007
Messages
7,656
Reaction score
33
lightly sand the backside of the needle until the orange disappears, then paint them white (a whiteout pen is perfect for this) It will look a million times better than leaving them clear regardless of what color LED you choose
 

Jerez

Member
Joined
Jun 25, 2011
Messages
212
Reaction score
0
Nail polish remover is what I use to remove the paint when I do the swaps...

And I use hobby shop spray paint to the color the person wants

Blue led on the needles- blue paint on needle.

Looks good so far :top:

I've gotten mixed reviews from clear to repainted needles but imho, painted is the way to go
 
Joined
May 14, 2012
Messages
807
Reaction score
0
I left mine non-painted for about a week and it is harder to see them during the day. So I hit the dollar store and got a cheap bottle of white out and it look 100 times better.
 

06 xrunner

New Member
Joined
Dec 21, 2012
Messages
556
Reaction score
0
Thanks guys for the info now just gotta wait for the LEDs to show up

My SS drop kit should be here tomorrow..can't wait to install that this weekend and be sittin sic finally
 

donovanbedwell

New Member
Joined
Jul 6, 2012
Messages
300
Reaction score
0
damn i want to swap my LEDs so bad but i have no idea where to start... :frown:
 

JFrame

Member
Joined
Dec 9, 2011
Messages
654
Reaction score
0
How small are the pins you have to solder on the LED's? I have very limited experience with a soldering iron and only about 30hrs with a welder. Is it pretty easy to do or should I probably look at finding someone else to solder it for me?
 

06 xrunner

New Member
Joined
Dec 21, 2012
Messages
556
Reaction score
0
It's very easy to do I hadn't soldered since back in high school about 15 years ago. The pins are pretty small but just make sure to use a low wattage soldering iron around 20-30 watts so not to fry the circuit board. The longest part is taking everything apart the soldering only takes about 30 min. I thought it would be a lot Hardee than it really was. Make sure to use a soldering pen type with a fine point not one of those big gun types.

Here's the link I followed
http://www.xr-underground.com/vb3/showthread.php?t=941

And these are the LEDs you need
http://www.oznium.com/plcc-2

Make sure to order enough the first time not like I did
Tach-2 LEDs
Speedo-3 LEDs
Fuel gauge-1 LED
Temp gauge- 1 LED
Turn signals- 4 LEDs (2 each)
LCD screen- 3 LEDs
Tach needle- 2 LEDs
Speedo needle- 3 LEDs
Fuel needle- 1 LED
Temp needle- 1 LED
All other indicators like engine light,tpms, headlight, engine light, etc are 1 LED

Let me know if you need anymore info
 

donovanbedwell

New Member
Joined
Jul 6, 2012
Messages
300
Reaction score
0
It's very easy to do I hadn't soldered since back in high school about 15 years ago. The pins are pretty small but just make sure to use a low wattage soldering iron around 20-30 watts so not to fry the circuit board. The longest part is taking everything apart the soldering only takes about 30 min. I thought it would be a lot Hardee than it really was. Make sure to use a soldering pen type with a fine point not one of those big gun types.

Here's the link I followed
http://www.xr-underground.com/vb3/showthread.php?t=941

And these are the LEDs you need
http://www.oznium.com/plcc-2

Make sure to order enough the first time not like I did
Tach-2 LEDs
Speedo-3 LEDs
Fuel gauge-1 LED
Temp gauge- 1 LED
Turn signals- 4 LEDs (2 each)
LCD screen- 3 LEDs
Tach needle- 2 LEDs
Speedo needle- 3 LEDs
Fuel needle- 1 LED
Temp needle- 1 LED
All other indicators like engine light,tpms, headlight, engine light, etc are 1 LED

Let me know if you need anymore info
thanks man! this is probably gonna save me a lot of grief haha
 
Top Bottom