Welcome!

By registering with us, you'll be able to discuss, share and private message with other members of our community.

SignUp Now!

Swaybarz

dramad1

Active Member
Joined
Mar 27, 2010
Messages
2,367
Reaction score
0
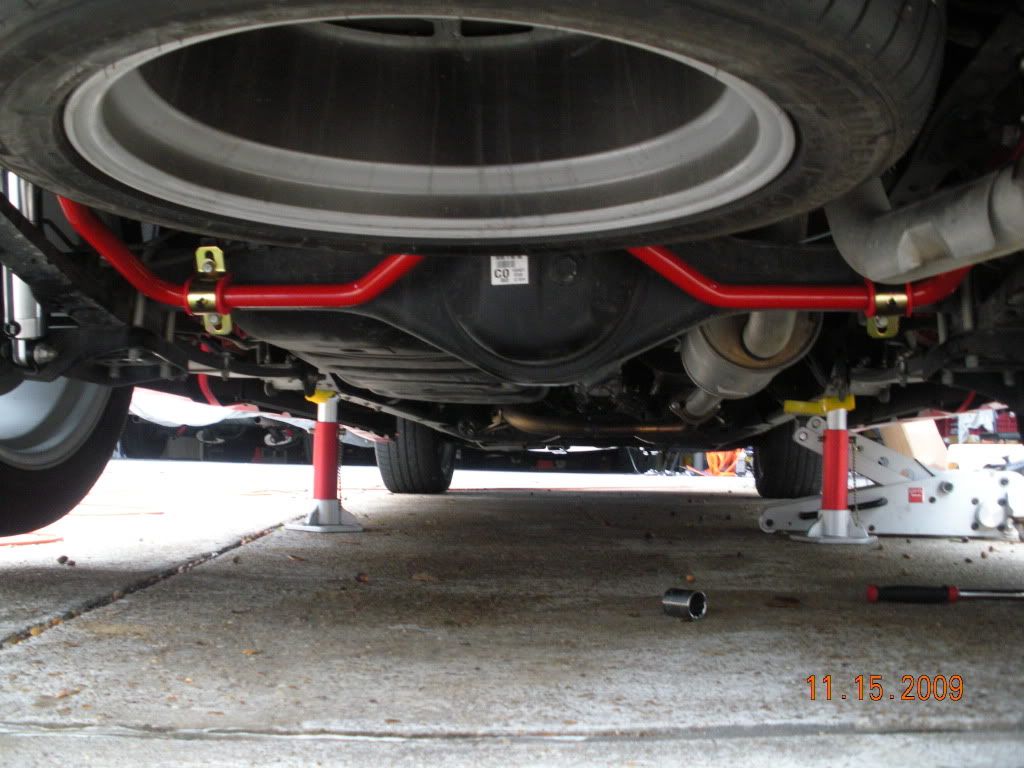
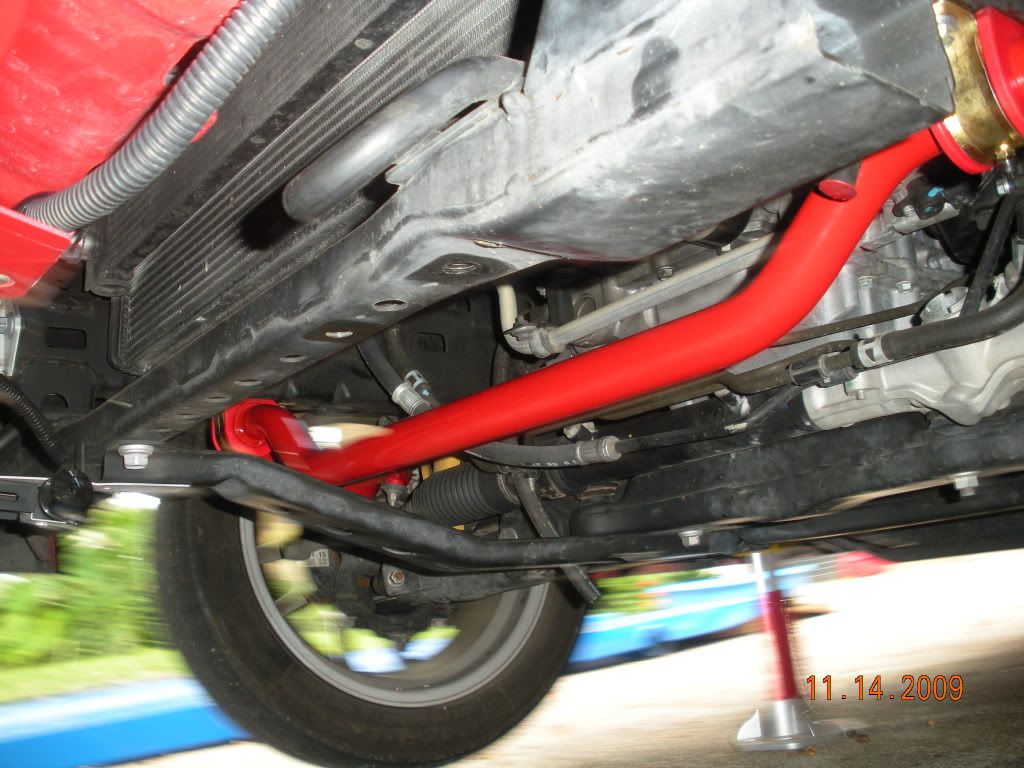
Just Recieved my sway kit this afternoon. Wanted to ask a couple questions about install. But first, big thanks to xii performance for quick shipping, giving me an update on status and quality products. Thx buck and Amy!
Now the questions. How long would you estimate this install would take? Is it simply remove stock bolts, remove stock hardware, then add new hardware and sways? Do I need any special tools? Torque specs. Also do I need to grind a bracket in the rear? Adjustable settings?, i planned on starting off in the middle setting.
I was gonna bug Sdxrunner to help me put these in but I believe he is busy w/ his welded diff and am pretty sure I can tackle this mod myself.
Any info would be appreciated. Thx fellas
 

Attachments

  • image-398892525.jpg
    image-398892525.jpg
    69.3 KB · Views: 234
Last edited:

K2

Administrator
Staff member
Joined
Dec 10, 2006
Messages
9,069
Reaction score
44
These are good questions to ask regardless for people that have never done it. Good post.
 

Coupe

Active Member
Joined
Dec 31, 2007
Messages
6,871
Reaction score
15
The front is pretty easy.

I think I had to remove the braces that attach to the radiator support that bolt to the front crossmember.

On the rear bar, the center two attachment points have a clip that has to be bent upwards.

I started off with the center position for the rear bar.

After you get them installed, be sure and grease the mounts.

Doing it by yourself, I would allow one hour a bar.

I would say half that if you have help.
 

dramad1

Active Member
Joined
Mar 27, 2010
Messages
2,367
Reaction score
0
Coupe said:
The front is pretty easy.

I think I had to remove the braces that attach to the radiator support that bolt to the front crossmember.

On the rear bar, the center two attachment points have a clip that has to be bent upwards.

I started off with the center position for the rear bar.

After you get them installed, be sure and grease the mounts.

Doing it by yourself, I would allow one hour a bar.

I would say half that if you have help.

Thanks coupe, much appreciated.
You said after they are installed to grease the mounts. Is there a specific kind of grease I should use or can I just use all purpose grease for automotive.
 

Coupe

Active Member
Joined
Dec 31, 2007
Messages
6,871
Reaction score
15
I had some synthetic grease, that I used. I think any multi-purpose grease would work.

The mounts have zerk fittings so they are easy to grease.

The sways are a good product. I have been very happy with mine.

I found a couple of pics.

mods018.jpg

mods007.jpg
 
Last edited:

sdxrunner619

Active Member
Joined
Jan 20, 2010
Messages
3,836
Reaction score
7
So how'd it go? Did yah get em in?

Diff was in and truck was working by 9pm....long freakin week...
 

dramad1

Active Member
Joined
Mar 27, 2010
Messages
2,367
Reaction score
0
sdxrunner619 said:
So how'd it go? Did yah get em in?

Diff was in and truck was working by 9pm....long freakin week...

My plan is for later today once it cools down a bit They just came in yesterday and was wondering if it was a simple swap. Remove old install new type of deal. I got the new headers in on Thursday. Took me 4 hours due to that stubhrn drivers side. I now have to fix the leak on my exaust, I have some 3" lap joint band clamps on order and should be here nxt week.
Glad to here you got that diff in so quickly. How does it feel? Did you have the guy that welded your knuckles weld it this time?What are your plans for your old one?
Shoot if your not doing anything and want to break that diff in, cruise up and give me a hand, I can shoot you some gas money.
 

sdxrunner619

Active Member
Joined
Jan 20, 2010
Messages
3,836
Reaction score
7
...implying its gonna cool down....ive gotta help with some errands arouns the house....otherwise I'd come lend a hand.


Front sway bar install, remove those two supports coupe mentioned, that go from cross member to core support.

Remove the two nuts from the endlinks that hold them to sway bar. Note the order in which you pulled the bushing off..

Once those are removed, remove the two brackets, and repeat the process back wards for the new front swaybar.


Rear, same deal, remove the end links. First. You will.need a 5 or 6mm Allen key insert into end of the endlinks threads, to hold it from spinning while you losen the nuts.

Remove the brackets That hold the sway bar to the axle. Once that's off, then you need to bend that tab up, the tab is on the surface of the axle, right where the swaybar mounts to it.. I used vise grips, even my scrawny ass got em.bent out of the way. Lol

Then install the sway bar in reverse order.

If you get hung up, just call me.
 

Crimson KING

New Member
Joined
Aug 6, 2012
Messages
145
Reaction score
0
Has anybody who installed these actually noticed a better performance in handling? I'm a bit of a skeptic when it comes to sway/stabilizer bars.
As far as normal everyday driving, do you feel the difference in corners?
 

dramad1

Active Member
Joined
Mar 27, 2010
Messages
2,367
Reaction score
0
sdxrunner619 said:
...implying its gonna cool down....ive gotta help with some errands arouns the house....otherwise I'd come lend a hand.

Front sway bar install, remove those two supports coupe mentioned, that go from cross member to core support.

Remove the two nuts from the endlinks that hold them to sway bar. Note the order in which you pulled the bushing off..

Once those are removed, remove the two brackets, and repeat the process back wards for the new front swaybar.

Rear, same deal, remove the end links. First. You will.need a 5 or 6mm Allen key insert into end of the endlinks threads, to hold it from spinning while you losen the nuts.

Remove the brackets That hold the sway bar to the axle. Once that's off, then you need to bend that tab up, the tab is on the surface of the axle, right where the swaybar mounts to it.. I used vise grips, even my scrawny ass got em.bent out of the way. Lol

Then install the sway bar in reverse order.

If you get hung up, just call me.

Right on, I'll let you know how it goes and if I have any other questions I'll be sure to hit you up.
 

sdxrunner619

Active Member
Joined
Jan 20, 2010
Messages
3,836
Reaction score
7
Has anybody who installed these actually noticed a better performance in handling? I'm a bit of a skeptic when it comes to sway/stabilizer bars.
As far as normal everyday driving, do you feel the difference in corners?

Huge difference. My truck is my daily driver and trackslut.
 

I<3JDM

Member
Joined
Sep 8, 2008
Messages
475
Reaction score
1
Has anybody who installed these actually noticed a better performance in handling? I'm a bit of a skeptic when it comes to sway/stabilizer bars.
As far as normal everyday driving, do you feel the difference in corners?

Way better on the corners:top: Id say look for a open space to drive and try whipping it left and right. You would also need to set the rear to the most stiffest setting (theres 3 holes the one towards the front of the truck) Have fun!
 

dramad1

Active Member
Joined
Mar 27, 2010
Messages
2,367
Reaction score
0
Installed today. Too hot yesterday. As with all my mods I ran into a few issues. Lol.
I started on the front first and got all the stock hardware/parts off no problem. The stock front sway almost took me out as I removed the last bolt, forgot it weighs about 20lbs. I unwrapped the new xii front sway and lined it up with out any issues. I finger tightened all the bolts and finger tightened the endlinks. New bushings are way to thick for the end links. I left them out for now but plan to trim them down a tiny bit and install them ASAP. May not be until nxt weekend though. I had issues with the passenger side endlink top nut. I had to get a tap and die to fix the threads on the nut and start of bolt. Just the very first thread on the nut was f'd up. Easy fix. Went on no problem after I re tapped it. Then I was using my impact to tighten all the bolts on the bushing mounts and radiator core support. I spun the head off of one of the bushing mount bolts- bottom drivers side. I drilled and extracted bolt and replaced with a new bolt. Man was I getting hit with all types of issues. I had to go buy a extractor kit and bit, I used a #2 extractor and a 7/64" bit. As I was drilling the bolt out the bit snapped in half- I barely applied any pressure. I took it back and got a new one. It was a hardend steel bit made to drill hardend steel. Blah blah blah. Lol got the front all finished and moved to the rear. I was able to bend the tabs up no problem, they actually bent fairly easy- I was surprised considering how thick they appear to be. My 3" catback got in the way of the rear side bolt- endlink bolt, so I removed the clamp and pushed it outta the way. Got the rear in no problem and made sure not to over tighten bolts. I greased all bushing and finished up. Since I removed the u bolt clamp on my exuast I decided to replace it with a 3" lap joint ss band clamp. I also used some ultra copper high temp rtv on the inside of Band clamp to help prevent a leak in the future.
Few pics.
 

Attachments

  • image-3388898785.jpg
    image-3388898785.jpg
    59.6 KB · Views: 204
  • image-4077890845.jpg
    image-4077890845.jpg
    64.7 KB · Views: 238
  • image-2410155703.jpg
    image-2410155703.jpg
    44.9 KB · Views: 197
  • image-519010411.jpg
    image-519010411.jpg
    53.4 KB · Views: 206
  • image-2578661604.jpg
    image-2578661604.jpg
    40.5 KB · Views: 200
  • image-1337879504.jpg
    image-1337879504.jpg
    57 KB · Views: 211
  • image-964742597.jpg
    image-964742597.jpg
    34.7 KB · Views: 214

BondXII

Well-Known Member
Joined
Feb 2, 2009
Messages
1,041
Reaction score
71
Looking good. Glad you were able to win even with the hang-ups along the way. Sorry for the endlink bushings. They are a pain the .... LOL. I'm sure if we did a pole for this, majority of the people here would say that they ended up just putting the OEMs back on. The best ways to get these bushings installed is to either use two large vise-grips and squeeze the bushings until you can get the nut started and tighten down from there. This method will work better sometimes while using sentence enhancers while trying to get both vise-grips to co-operate with one another. The other method would be what you said and shave them down until they get small enough to get the nut started without needing vice grips. We tried to get Energy Suspension to make these bushings smaller for us but we would have had to buy a gazillion or so for them to do it for us, since it would be specific to this application. Maybe we'll find someone that will make these endlink bushings in the future.

Enjoy the turns!
 

dramad1

Active Member
Joined
Mar 27, 2010
Messages
2,367
Reaction score
0
Already noticing the difference. Body roll has been reduced alot. Truck feels More level in the turns. There are a few corners by my house that I take every day and before the sways-truck had lots of body roll.
I challenged the kit on these same turns today and am very impressed. Committed to the turn and speed, didn't see the Fella coming up To the stop sign on same turn, blind corner, xii sways sucked it up and took it like a charm. I wasn't going extreme drift on it as I do care for others on the road, but i could tell it scared the sh!t outta dude coming up on the stop sign.
It seems like instead of body roll, the rear wants to slide now. Witch is cool but just need to watch the oversteer/under steer. I'm impressed thus far with the kit. Install really wasn't complicated at all, pretty much just swapping the stock for the xii's. I had a few hiccups but was able to get through it and get them in. Thanks xii performance and xru for the product, guidance, and just complete awesomeness!! Glass is tipped to you all. Thxs
 

macg33k

Member
Joined
May 8, 2012
Messages
104
Reaction score
3
I actually just put these swaybars on is weekend, too. I had many less issues and was able to get the new bushings on by using two vice grips...but in a slightly different way than be might think. Here's how:

First, I put the new Energy Suspension bushing under the swabar and then the swaybar, factory bushing, top washer and nut on and tightened down a ways. Then, I clamped one vice grip on the end link near the top -- perpendicular to the end link (under the swaybar). Then, I used a second vice grip and clamped between the first vice grip and the swaybar (since they are parallel to each other). With this rig keeping the bottom bushing compressed, I quickly removed the nut, top washer, and top factory bushing and put on the new bushing, top washer, and nut again. Then, I tightened down the nut a bit until enough threads were through and removed my vice grip rig. Then, finish tightening the top nut down.

Hopefully that makes sense to everyone - and helps someone else put their bushings on. It's really not that hard once you use a little ingenuity. :)
 

dramad1

Active Member
Joined
Mar 27, 2010
Messages
2,367
Reaction score
0
This weekend I'll be putting in the endlink bushings. I may try this approach, using the vise grips. Thxs for the info.
On a side note, I did run into a few issues during install but was able to overcome them and get the install done properly minus the new bushings on endlinks. Funny thing I should mention though is, I thought those small bushings were for the rear sway links, I called Sdxrunner after I had the front installed to ask him about them. Sounded like I woke him up but he confirmed they were for the front. He mentioned I may have a hard time getting them in and could shave them if I wished. I opted to get the rear installed and finish up for the day cause my three boys were bored and wanting to get outta the house. Plus the wife was a Lil pissy cause I have spent the last two weekends wrenching on the x. So this coming weekend ill try to get the new bushings in and hopefully w/o issues. Lol
The overall performance that I have noticed over the last few days of driving is like night and day in the corners. Maybe I'm just imagining it but my x feels like its level and able to take those sharp turns with a more aggressive approach.
 

sdxrunner619

Active Member
Joined
Jan 20, 2010
Messages
3,836
Reaction score
7
This weekend I'll be putting in the endlink bushings. I may try this approach, using the vise grips. Thxs for the info.
On a side note, I did run into a few issues during install but was able to overcome them and get the install done properly minus the new bushings on endlinks. Funny thing I should mention though is, I thought those small bushings were for the rear sway links, I called Sdxrunner after I had the front installed to ask him about them. Sounded like I woke him up but he confirmed they were for the front. He mentioned I may have a hard time getting them in and could shave them if I wished. I opted to get the rear installed and finish up for the day cause my three boys were bored and wanting to get outta the house. Plus the wife was a Lil pissy cause I have spent the last two weekends wrenching on the x. So this coming weekend ill try to get the new bushings in and hopefully w/o issues. Lol
The overall performance that I have noticed over the last few days of driving is like night and day in the corners. Maybe I'm just imagining it but my x feels like its level and able to take those sharp turns with a more aggressive approach.

To much partying for me....you did wake me up....
And the sway bars do make the truck handle more agressive..

Next time you want help wrenching, head west to my pad, where its not 100*s out....other then for dire emergencies, im gonna look for any excuse to not drive out to Satan's bung hole....:laugh:
 

dramad1

Active Member
Joined
Mar 27, 2010
Messages
2,367
Reaction score
0
sdxrunner619 said:
To much partying for me....you did wake me up....
And the sway bars do make the truck handle more agressive..

Next time you want help wrenching, head west to my pad, where its not 100*s out....other then for dire emergencies, im gonna look for any excuse to not drive out to Satan's bung hole....:laugh:

For sure kev. Im gonna need your expertise pretty soon here when that spacer comes in. I'll hit you up.
Lol on the partying. Sorry to have waken you in the middle of the day. Lol
Satans bung hole is getting old, but summer is almost over and it will cool down. Still though, I'd be down to cruise to your pad. I'd need directions though, Lol
 
Top Bottom