- Joined
- Nov 8, 2007
- Messages
- 3,149
- Reaction score
- 10
Anything in yellow is an editing note.
I wanted to put together some information on the T56 swap all in one place. This will be pic heavy supplemental info for anyone who is going to do this, Or someone who may pick up used parts down the road and need to complete the kit on their own.
I want to thank everyone who did this before me, Especially Torspd, blackx-runner, and turbomach1. And sweetwilliebrownjr for selling me his kit.
original swap discussion thread:
http://www.xr-underground.com/vb3/showthread.php?t=34093
Second thread:
http://www.xr-underground.com/vb3/showthread.php?t=42148
turbomach1's swap thread:
http://www.xr-underground.com/vb3/showthread.php?t=49072
Torspd's mega thread:
http://www.xr-underground.com/vb3/showthread.php?t=39436
sweetwilliebrownjr's shifter thread:
http://www.xr-underground.com/vb3/showthread.php?t=46477
My photobucket album of pics. There are some dupes, and extras, but i got most of the important ones posted: http://s57.photobucket.com/user/revobreaker/library/T56%20swap
APR Designed the conversion kit and as of right now there is one piece that is next to impossible for you to get, that is the bell housing adapter. All of the other pieces can be sourced or fabricated with relative ease. The bell housing adapter could be fabricated, but that is going to require r&d time and $$$. APR may or may not have kits available, I am unsure the total number they produced and shipped. I do not believe that APR is producing these kits anymore. If you want to get this done you will have try to find a used kit or try to develop your own. NOTE: APR is no longer a vendor on XRU and this thread is not the place do discuss APR, their business, or group buys.
First up the instructions developed with the kit. In my opinion they are rather lacking, but on the other hand this conversion is not for everyone and takes a certain amount of knowledge and confidence to undertake. I think they may have also left the instructions a little vague because of some variants in T56 transmissions available If you have the full kit this is really a bolt on system the only thing you have to modify is cutting the hole in the floor to allow the shifter to come through, and getting the drive shaft cut down to fit.
need to check links to make sure PDFs come up right
T56 install instustions
T56 wiring instructions
T56 schematic
DakotaDigital calibrator instructions
This is all based on my experience of completing the swap:
The parts NOT included in the kit that you have to source:
-Clutch disk (turbomach1 found an 11" Camaro disk with the correct splines from summit racing. I am also currently using this disk for now. Centerforce p/n:381017 http://www.summitracing.com/parts/ctf-381017)
-Flywheel (needs a pilot bearing installed)
-Pressure plate
(Gadget at URD should be able to help with those three, and has a twin disk setup, as does MceLeod racing)
-T56 transmission (1998ish Camaro has been recommended as a donor, many other options and variations are available too)
-Shifter & knob (I am using a MGW Fbody shifter http://www.mgwltd.com/camaro_short_throw_shifter.shtml)
-Drive shaft work (approx. 1" is cut off the front shaft, and then the whole assembly is re balanced)
-Gear change in the rear, the ration depends on the ration you have in your trans ( I ordered a fully built 4.10 third member from Justdifferentials for a quick drop in solutionhttp://www.justdifferentials.com/index.php?main_page=index&cPath=44)
-Trans Fluid ( T56 uses ATF!, I went with stuff from Amsoil)
-Gear oil for when you open the rear (Also used Amsoil)
Shiftboot?(I was able to reuse mine, but it was a custom made boot and custom bent shifter)
-
Parts included in the kit:
Bellhousing! Unique to this kit!
NOTE: The Toyota bellhousing has mounting spots for the Exhaust hangers that connect to the header collector flange. the new belhousing does NOT include any mounting options for this, the hangers do not get reused


Trans crossmember. This is nicely built and bolts right up. Someone with decent fab skills and tools could reproduce this.


Transmission mount from energy suspension p/n 3.1108G

Pilot bearing to be installed into flywheel p/n 6002 2rs

Shift stalk Hurst p/n 2388009

Inner Shift boot Spectre p/n 6284

Shift hole cover piece of metal (I just used some flashing on mine)

Throwout bearing NAPA p/n 360058
NOTES: this throwout bearing/slave cylinder is 'unique' APR machined a spacer that mounts on the tip of this bearing. The problem is that if you have to replace the assembly you have to transfer the spacer over, simple right? Well that depends on you finding that exact assembly As of now the exact same part number from Napa is different. it appears that there has been a revision made and the new TOB is not compatible with the spacer. The new TOB is rounded and wider. Otherwise you are going to need to develop a new spacer or find a different assembly. Torspd has worked with Mcleod Racing and is using an adjustable version (more info needed)


Yoke - 1330 series 27 spline fits t350 and powerglides The yoke needs to be mounted to your drive shaft with a new u-joint when it is shortened and balanced.


Dakota Digital Speedo Conversion Box p/n SGI-5 rev. c
see my install here http://www.xr-underground.com/vb3/showthread.php?t=52312

Wiring harnesses (all of these plugs are common T56 plugs that can be easily found)
Reverse lock out solenoid

relay for reverse lock out(pre attached to the Dakota Digital box)

VSS harness

reverse lamp switch (notice it comes wit wires epoxied into the switch)

Need specs on bolts:
T56 to bellhousing bolts

Shifter bolts

Crossmember bolts

Throwout Bearing

The T56 has twice as many electronics as the stocker: reverse lockout solenoid, reverse lamp switch, Speed sensor and a skip shift solenoid.
Stock trans top-down view. Blue circled connector on the left is the VSS. The Green one is the reverse lamp switch.

Standard T56 reverse switch (purple arrow) with a connector harness. (on right side of T56, pic taken from under the trans, looking toward the front of the truck. Notice the connector makes it considerably longer and I had to "massage" the truck a little bit as you can see to the right of the connector.

The left side of the T56 (still under it facing toward the front of the truck) You can see the Yellow circle is the Reverse solenoid, and the Red circle is the VSS.

There is also a skip-shift solenoid , but its not necessary so I didnt worry bout it.
The reverse lamp switch is easy, connect the two wires to the stock harness ( I dont think polarity matters as I believe its just a switch closure and I did not pay attention to how I connected mine.)
The factory VSS connector is three wire, the T56 is 2
I cant remember which wire goes where off the top of my head
You have some options for the reverse lockout:
The solenoid can be left un-hooked, and you can strong arm it into reverse.
Or you can connect a switch that you manually hit when you want to make it easier to go into reverse. The solenoid just need 12v and ground (polarity doesn't matter).
You can wire it up via the instructions with the X-1. (If you have a UCON you will have to check with URD)
OR:
Since I am not using the x1 so their wiring instructions are next to useless for me.
But I did find this stand alone module which only activates the solenoid while under 5mph
http://www.samocoind.com/T56MODULE.htm
I went ahead and bought one and installed it. it works! It does seem to have a little more of a delay then I was expecting. The instructions say that it deactivates the reverse lockout at 5mph, but many times I feel that I have to completely stop before it allows me to go into reverse (still better than having to strong arm it IMO)

This thing comes with instructions that are really easy to follow, and each wire is labled.

Clutch hydraulics adapter
This is a custom made adapter -3AN Male to 10mm x 1.0 Female Inverted Flare. If you know someone who can tig weld it could be reproduced. This connects directly from the new TOB/slave assemble to the factory Toyota line.


Torspd found a pre-made fitting available from Jeggs: Earl's#361-989538
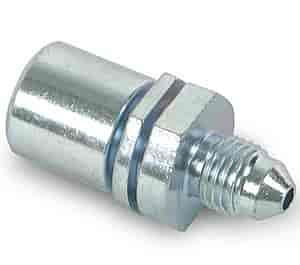
http://www.jegs.com/i/Earls/361/9895...arentProductId=
I wanted to put together some information on the T56 swap all in one place. This will be pic heavy supplemental info for anyone who is going to do this, Or someone who may pick up used parts down the road and need to complete the kit on their own.
I want to thank everyone who did this before me, Especially Torspd, blackx-runner, and turbomach1. And sweetwilliebrownjr for selling me his kit.
original swap discussion thread:
http://www.xr-underground.com/vb3/showthread.php?t=34093
Second thread:
http://www.xr-underground.com/vb3/showthread.php?t=42148
turbomach1's swap thread:
http://www.xr-underground.com/vb3/showthread.php?t=49072
Torspd's mega thread:
http://www.xr-underground.com/vb3/showthread.php?t=39436
sweetwilliebrownjr's shifter thread:
http://www.xr-underground.com/vb3/showthread.php?t=46477
My photobucket album of pics. There are some dupes, and extras, but i got most of the important ones posted: http://s57.photobucket.com/user/revobreaker/library/T56%20swap
APR Designed the conversion kit and as of right now there is one piece that is next to impossible for you to get, that is the bell housing adapter. All of the other pieces can be sourced or fabricated with relative ease. The bell housing adapter could be fabricated, but that is going to require r&d time and $$$. APR may or may not have kits available, I am unsure the total number they produced and shipped. I do not believe that APR is producing these kits anymore. If you want to get this done you will have try to find a used kit or try to develop your own. NOTE: APR is no longer a vendor on XRU and this thread is not the place do discuss APR, their business, or group buys.
First up the instructions developed with the kit. In my opinion they are rather lacking, but on the other hand this conversion is not for everyone and takes a certain amount of knowledge and confidence to undertake. I think they may have also left the instructions a little vague because of some variants in T56 transmissions available If you have the full kit this is really a bolt on system the only thing you have to modify is cutting the hole in the floor to allow the shifter to come through, and getting the drive shaft cut down to fit.
need to check links to make sure PDFs come up right
T56 install instustions
T56 wiring instructions
T56 schematic
DakotaDigital calibrator instructions
This is all based on my experience of completing the swap:
The parts NOT included in the kit that you have to source:
-Clutch disk (turbomach1 found an 11" Camaro disk with the correct splines from summit racing. I am also currently using this disk for now. Centerforce p/n:381017 http://www.summitracing.com/parts/ctf-381017)
-Flywheel (needs a pilot bearing installed)
-Pressure plate
(Gadget at URD should be able to help with those three, and has a twin disk setup, as does MceLeod racing)
-T56 transmission (1998ish Camaro has been recommended as a donor, many other options and variations are available too)
-Shifter & knob (I am using a MGW Fbody shifter http://www.mgwltd.com/camaro_short_throw_shifter.shtml)
-Drive shaft work (approx. 1" is cut off the front shaft, and then the whole assembly is re balanced)
-Gear change in the rear, the ration depends on the ration you have in your trans ( I ordered a fully built 4.10 third member from Justdifferentials for a quick drop in solutionhttp://www.justdifferentials.com/index.php?main_page=index&cPath=44)
-Trans Fluid ( T56 uses ATF!, I went with stuff from Amsoil)
-Gear oil for when you open the rear (Also used Amsoil)
Shiftboot?(I was able to reuse mine, but it was a custom made boot and custom bent shifter)
-
Parts included in the kit:
Bellhousing! Unique to this kit!
NOTE: The Toyota bellhousing has mounting spots for the Exhaust hangers that connect to the header collector flange. the new belhousing does NOT include any mounting options for this, the hangers do not get reused
Trans crossmember. This is nicely built and bolts right up. Someone with decent fab skills and tools could reproduce this.
Transmission mount from energy suspension p/n 3.1108G
Pilot bearing to be installed into flywheel p/n 6002 2rs
Shift stalk Hurst p/n 2388009
Inner Shift boot Spectre p/n 6284
Shift hole cover piece of metal (I just used some flashing on mine)
Throwout bearing NAPA p/n 360058
NOTES: this throwout bearing/slave cylinder is 'unique' APR machined a spacer that mounts on the tip of this bearing. The problem is that if you have to replace the assembly you have to transfer the spacer over, simple right? Well that depends on you finding that exact assembly As of now the exact same part number from Napa is different. it appears that there has been a revision made and the new TOB is not compatible with the spacer. The new TOB is rounded and wider. Otherwise you are going to need to develop a new spacer or find a different assembly. Torspd has worked with Mcleod Racing and is using an adjustable version (more info needed)
Yoke - 1330 series 27 spline fits t350 and powerglides The yoke needs to be mounted to your drive shaft with a new u-joint when it is shortened and balanced.
Dakota Digital Speedo Conversion Box p/n SGI-5 rev. c
see my install here http://www.xr-underground.com/vb3/showthread.php?t=52312
Wiring harnesses (all of these plugs are common T56 plugs that can be easily found)
Reverse lock out solenoid
relay for reverse lock out(pre attached to the Dakota Digital box)
VSS harness
reverse lamp switch (notice it comes wit wires epoxied into the switch)
Need specs on bolts:
T56 to bellhousing bolts
Shifter bolts
Crossmember bolts
Throwout Bearing
The T56 has twice as many electronics as the stocker: reverse lockout solenoid, reverse lamp switch, Speed sensor and a skip shift solenoid.
Stock trans top-down view. Blue circled connector on the left is the VSS. The Green one is the reverse lamp switch.
Standard T56 reverse switch (purple arrow) with a connector harness. (on right side of T56, pic taken from under the trans, looking toward the front of the truck. Notice the connector makes it considerably longer and I had to "massage" the truck a little bit as you can see to the right of the connector.
The left side of the T56 (still under it facing toward the front of the truck) You can see the Yellow circle is the Reverse solenoid, and the Red circle is the VSS.
There is also a skip-shift solenoid , but its not necessary so I didnt worry bout it.
The reverse lamp switch is easy, connect the two wires to the stock harness ( I dont think polarity matters as I believe its just a switch closure and I did not pay attention to how I connected mine.)
The factory VSS connector is three wire, the T56 is 2
I cant remember which wire goes where off the top of my head
You have some options for the reverse lockout:
The solenoid can be left un-hooked, and you can strong arm it into reverse.
Or you can connect a switch that you manually hit when you want to make it easier to go into reverse. The solenoid just need 12v and ground (polarity doesn't matter).
You can wire it up via the instructions with the X-1. (If you have a UCON you will have to check with URD)
OR:
Since I am not using the x1 so their wiring instructions are next to useless for me.
But I did find this stand alone module which only activates the solenoid while under 5mph
http://www.samocoind.com/T56MODULE.htm
I went ahead and bought one and installed it. it works! It does seem to have a little more of a delay then I was expecting. The instructions say that it deactivates the reverse lockout at 5mph, but many times I feel that I have to completely stop before it allows me to go into reverse (still better than having to strong arm it IMO)
This thing comes with instructions that are really easy to follow, and each wire is labled.
Clutch hydraulics adapter
This is a custom made adapter -3AN Male to 10mm x 1.0 Female Inverted Flare. If you know someone who can tig weld it could be reproduced. This connects directly from the new TOB/slave assemble to the factory Toyota line.
Torspd found a pre-made fitting available from Jeggs: Earl's#361-989538
http://www.jegs.com/i/Earls/361/9895...arentProductId=
Last edited by a moderator:


")


