Welcome!

By registering with us, you'll be able to discuss, share and private message with other members of our community.

SignUp Now!

The process of installing a URD MRK III S/C

turbomach1

Member
Joined
Feb 13, 2012
Messages
209
Reaction score
0
so ready for some pics and videos on this build. like christmas
 

scoutdeed69

New Member
Joined
Mar 8, 2011
Messages
222
Reaction score
1
wells heres a pic of the 90% completion!
IMAG0152.jpg

heres another
IMAG0157.jpg

I took alot of photos so its going to take a bit to put together and do the write up on this! So be patient not much longer on this!

Rob....scouts out:rockon:
 

scoutdeed69

New Member
Joined
Mar 8, 2011
Messages
222
Reaction score
1
Tell me about it...its realy quick, compared to stock....thats for sure...i need to get use to driving it now... with the stock trans...it kinda of funny, i started talking to my pops about the transmission he has here....even though i new he had the trans for some time now when i was working at Acura few years back.... that he actualy has a t56 trans that at one time I was supposed to rebuild...and i have had no time of rebuilding for him at that time period cause of work, well that im back home form the military i have plenty of time now plus work... he told me go ahead and rebuild it....i deffentily will now that i actualy have something to put it now... after reading most of the threads about the crapy toyota trans everyone is having with and installing the T56....thats my next project i will be looking in doing pretty soon...

Rob...scouts out:rockon:
 

RRX

New Member
Joined
May 22, 2012
Messages
335
Reaction score
0
I will be the next one in the 450 :rockon: club I just have wait tell I get home to intall it. Everything has been sitting in at my house for the past to weeks waiting for me.
 

scoutdeed69

New Member
Joined
Mar 8, 2011
Messages
222
Reaction score
1
I will be the next one in the 450 :rockon: club I just have wait tell I get home to intall it. Everything has been sitting in at my house for the past to weeks waiting for me.


So your in the military im guessing here, that your deployed to AFG?
 

Whitebeauty

New Member
Joined
Oct 15, 2011
Messages
5,237
Reaction score
0
I will be the next one in the 450 :rockon: club I just have wait tell I get home to intall it. Everything has been sitting in at my house for the past to weeks waiting for me.


get the stage 3
 

RRX

New Member
Joined
May 22, 2012
Messages
335
Reaction score
0
No I work for KOMATSU America as a product manager. I am in china as of right now and will not be home tell the 27th. I can't get home fast enough. I will have a whole lot off work when I get home. I am going the the S/C kit but the exhaust is already done, doing the clucth, lowing blocks in the rear,traction bar, sound system and deadening through out the hole truck, and black leather seats. My girl friend said the parts pill is getting really big.
 

scoutdeed69

New Member
Joined
Mar 8, 2011
Messages
222
Reaction score
1
Going to watch the new spidy man now...in IMAX should be bad a** i hope! Well i finaly recorded a video with sound latter will post it, was with my phone...listening on my phone not play very loud...so hope yall can play it on ur comp. With it being louder! N i will be posting more pics after the movie when i get home!

Rob....scouts out
 

Moneyblind

Active Member
Joined
Mar 25, 2012
Messages
1,070
Reaction score
1
Going to watch the new spidy man now...in IMAX should be bad a** i hope! Well i finaly recorded a video with sound latter will post it, was with my phone...listening on my phone not play very loud...so hope yall can play it on ur comp. With it being louder! N i will be posting more pics after the movie when i get home!

Rob....scouts out

Meh, GL. I wasnt too impressed;
 

trd_sport

Active Member
Joined
Feb 18, 2007
Messages
6,563
Reaction score
1
yeah the poll on yahoo said people like tobey mcguire spiderman better than andrew garfield, which is like wtf cuz i thought tobey was lame as hell.

anyway yeah post the vid, or for get some times at the track!
 

scoutdeed69

New Member
Joined
Mar 8, 2011
Messages
222
Reaction score
1
Hey everyone, thats been looking on this thread...I have finaly converted my phones (it was mounted in cab as u can see the mount!) video over so i can play on youtube.....at the begining of this clip..windows are closed.....at the start of the 2nd light im behind a Acura TL.... that is when i have the windows down!....I have another one that im going to upload in a moment on youtube where u will be able to see it! Sorry it has taken me a bit...still working on the other pics of the build!

Rob.....scouts out

http://youtu.be/7hgKiiSo4jc
 

scoutdeed69

New Member
Joined
Mar 8, 2011
Messages
222
Reaction score
1
IMAG0056.jpg

twist shifter off to the left. use clip tool from harbor frieght.
http://www.harborfreight.com/5-piece-auto-trim-and-molding-tool-set-67021.html
makes it easier to remove cup holder with out damage to it cause its plastic.
IMAG0057.jpg

use a angle or a 90* tool to pull the cloth up!
IMAG0058.jpg

remove the 10mm bolts.
IMAG0059.jpg

(the circles) are clips that u need to pull back a little, arrows are plastic hooks on the back half of console. need to left up the whole console and pull back after u remove the screws.
IMAG0061.jpg

the front half comes straight back to the shifter, may need to pull shifter in 2nd gear to help with room..then put in neutral for removel and installation!
IMAG0062.jpg

Arrows show clips that you need to push in the center and left up to where u can pull out, and unbolt the sheet metal bolts! take off boot.
IMAG0063.jpg

lift up the boot, so you can smack the side of the shifter with a block of small wood and a hammer to release the RTV sealant holding it..1st remove bolts 12mm, completely. it makes it a lot easier with bolts out!
IMAG0064.jpg

this is some locations you can tap at, if u can't get at the very base of it, u can at the round part to release the sealant!
IMAG0065.jpg

remove the nylon botton, i used a long needle nose pliers
http://www.harborfreight.com/2-piec...-angle-long-reach-needle-plier-set-33202.html I could not use my hand or fingers, it was on to tight... make sure u protect the botton by not damaging it, cause You are going to reuse it.
IMAG0066.jpg

clean off both sureface's of the shifter and the trans base...remove doll pins, put on shifter plate...both sides of plate has wholes drill out, only 2 of them on each side of same whole...it goes on one way, make sure u put the pins in all the way...if u can, get 2 more from toyota so u can put on the other side to help with alignment.
IMAG0069.jpg

IMAG0070.jpg

here you see the new shift kit...2 spacers in kit, go on a certain way. Put on shaft together slide the ball kit over it.. put on some lock tight on the key bolt..red one if u got it..install the key bolt in the new ball shaft. put 2 dimples next to the key bolt so it will not back out...its good to have a real pointy tip punch helps alot..it does not need to be a big punch either...tap about 3 good time should do it! install the nylon botton with some grease on it not alot either! it helps to move smoothly when installed. Make sure u install sealant on both sides of plate...u can put on trans side and at the bottom of the shifter base to help of not making to much mess on your hands.
IMAG0071.jpg

you can see it installed now! just put everything you took off, back on in the reverse order! Good luck on who is installing it!

Rob...That was the 1st step in my installation
 

scoutdeed69

New Member
Joined
Mar 8, 2011
Messages
222
Reaction score
1
Ok the next thing i started off with was the process of removing the fuel pump..
IMAG0094.jpg

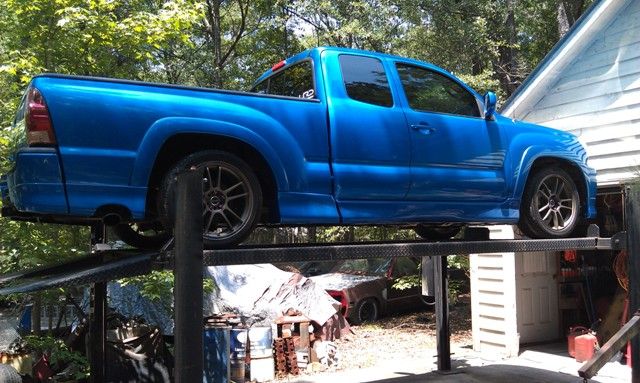
well 1st put on lift to work on the X if you can if not gets some good jack stands!
next is to figure out what you must remove from the bed of the truck.
IMAG0095.jpg

does not matter what side you start with just start anywhere!
IMAG0096.jpg

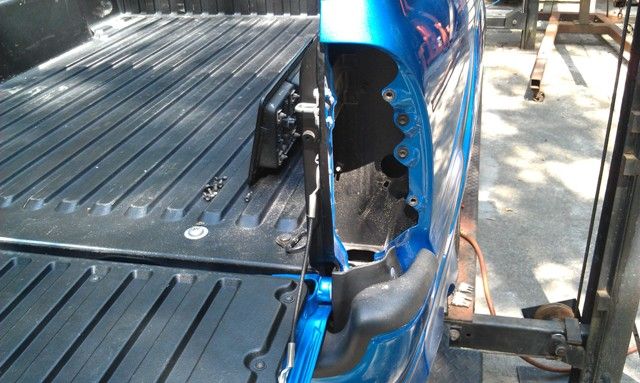
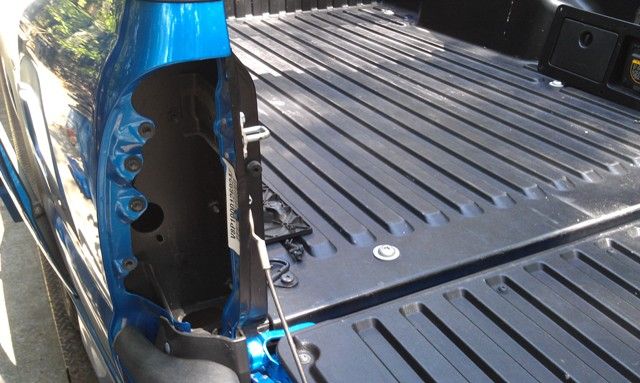
Take out the 3 bolts that hold in the tail lights and pull out a little and your going to need to twist a little to get the light out. There is a main plug that attaches to the housing...just unclip it and you light is urs...start pulling out the harness, by pushing down in the hole u can see at the bottom there of the lamp.u can use ur fingers to unclip it or needle nose.
IMAG0097.jpg

you can see here where the bolts are out of the lamp! also take out that pocket that holds in the outlet to unplug it so u can push it down the other whole there...make sure u un clip the harness! this is best so u don't have to replace it and if u cut it and put it in lose it will cause a noise u may one day try find out where the noise coming from. u can wire tie it but that is lazy work, and not good quality work!
IMAG0076.jpg

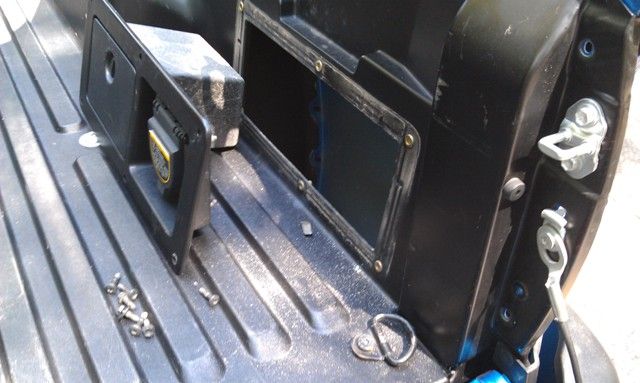
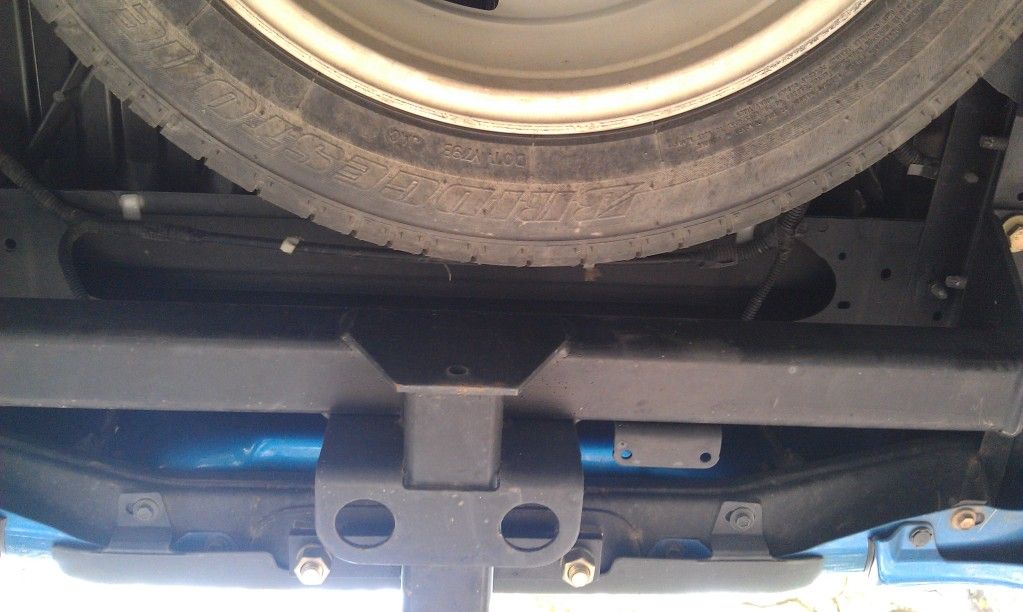
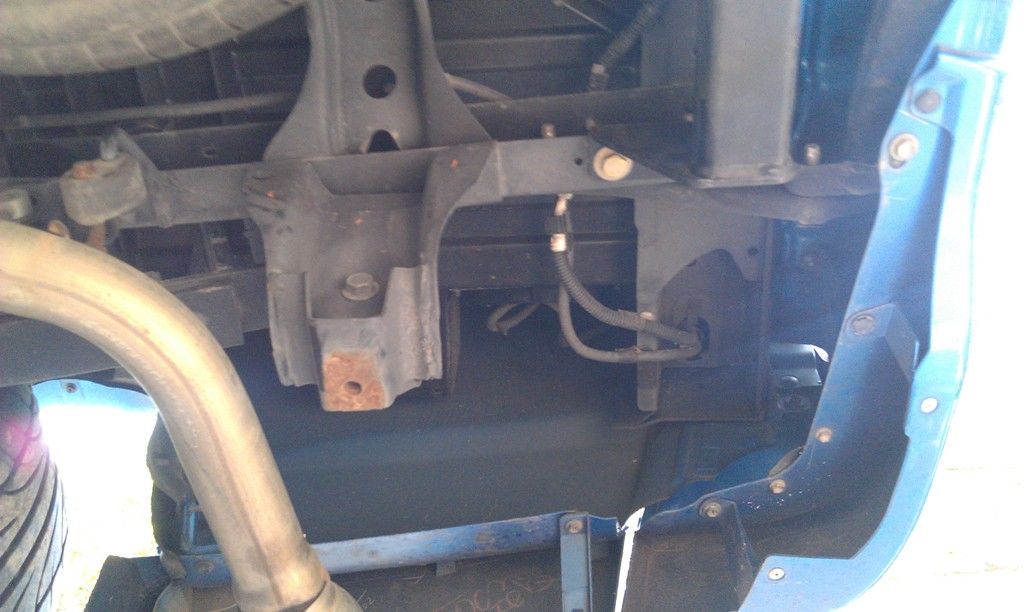
you can see the harness that goes to the back of the X above the trailer hitch. they are your tag lamp lights i just pulled them out. and uncliped them from the frame there.
IMAG0075.jpg

you can see the oval shaped who;e thats the brake lamp harness just unclip it and pull it down.
thats the driver side.
IMAG0074.jpg

thats the passenger side, do the same as you did the driver side.
IMAG0080.jpg

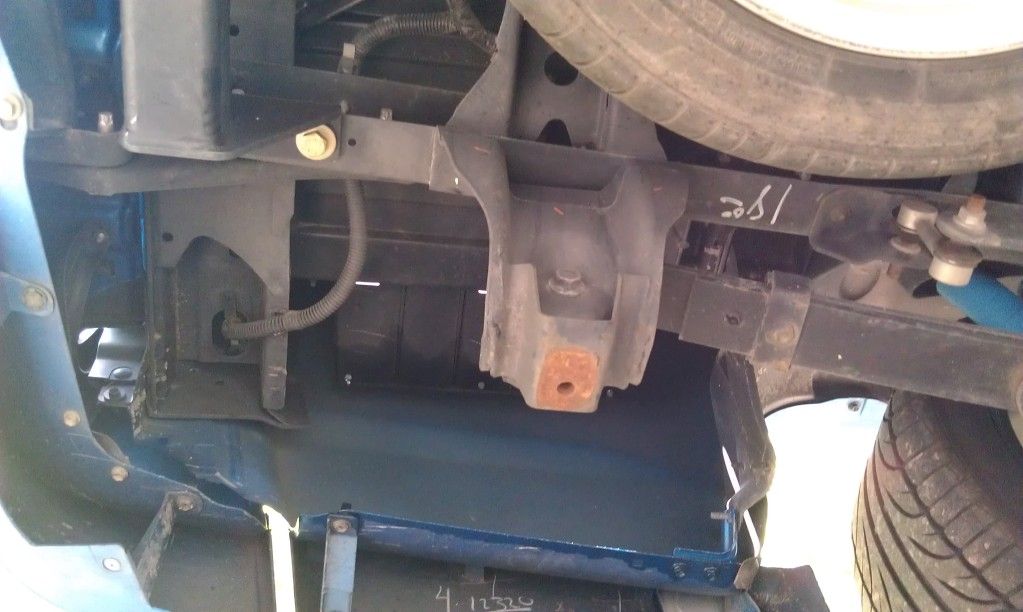
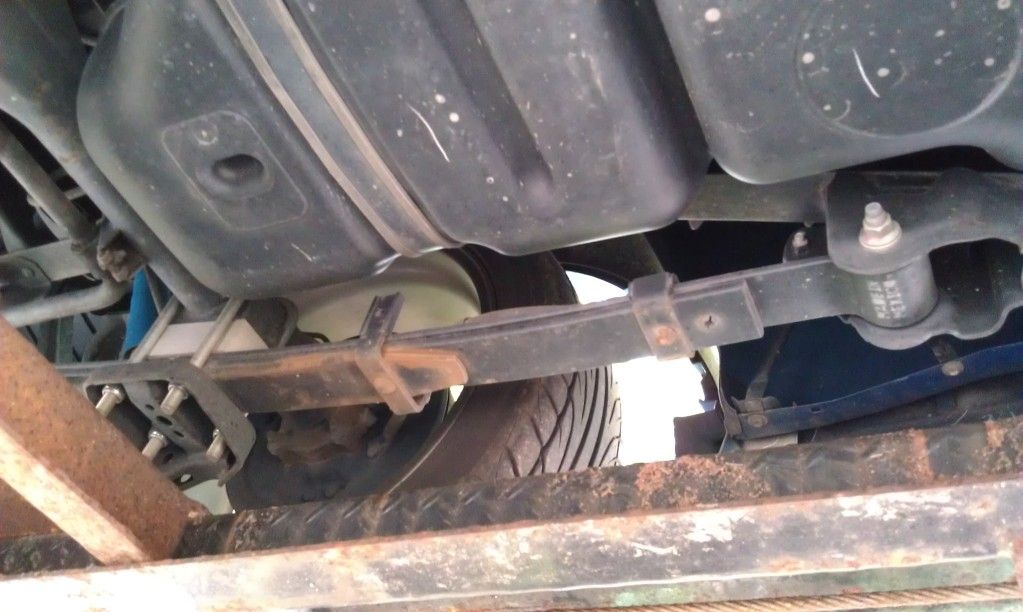
i did not get a good picture of this part..was to busy trying to figure it out! you must seperate the fuel neck from the bed so i ended up trying to remove the finder liner and even gone as far as removing the body kit on that coner of the bed. u will need to remove the finder liner to get at the fuel neck, once it is up enough u can just pull the neck out, as it is only rubber around it....as i was lifting the bed i kept going back and forth to each side to make sure the neck and the bed would clear and not hurt the body of the X. if you look once the bed is up in the air. on that corner of the bed. there is an alignment pin that must go back the same way in as it did coming out! thats just a reminder when ur all done with the pump!
Ok this is the harder part of seperating of the bed.
IMAG0108.jpg

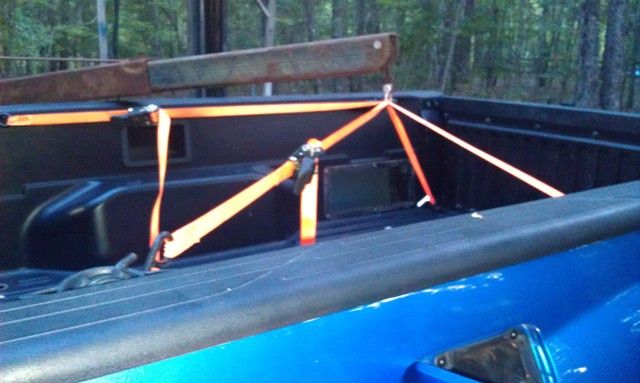
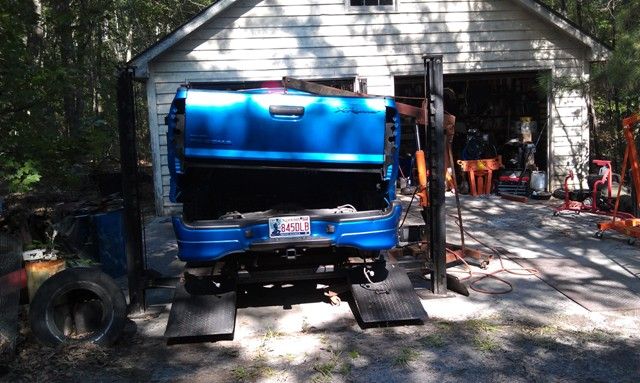
well this is my way of lifting my bed up by myself, when i had no one to help out! plus its hard with that darn lift leg in the way to move my bed out of the way.
IMAG0098.jpg

That was my hight that i could lift it so i could get under neith it..not good by yourself, but it work for me!
IMAG0099a.jpg

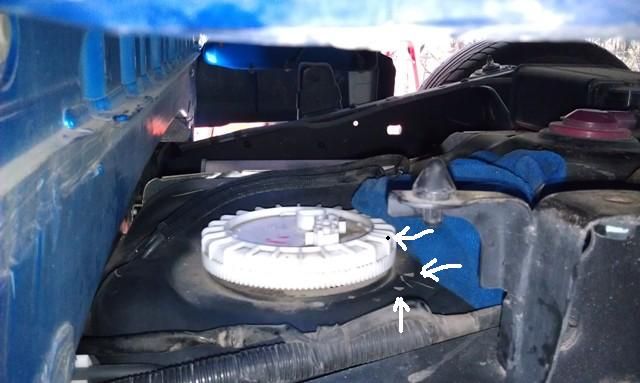
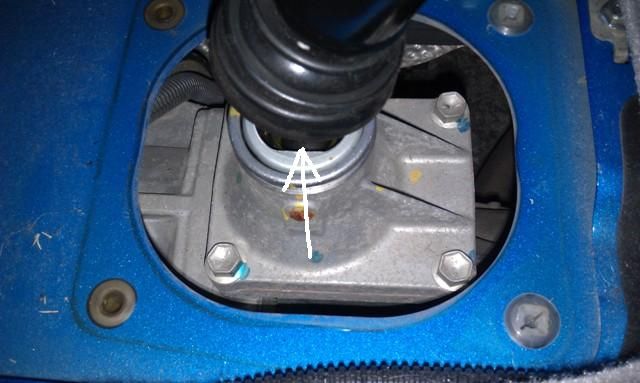
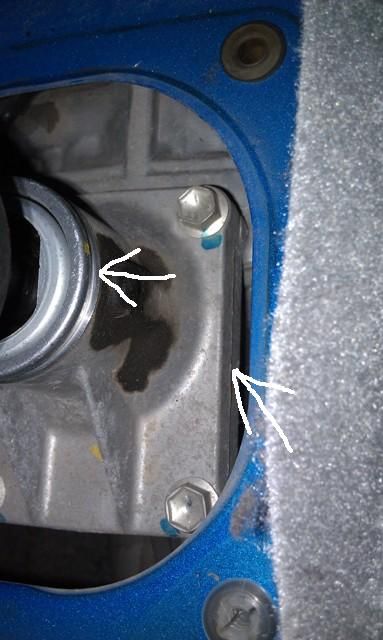
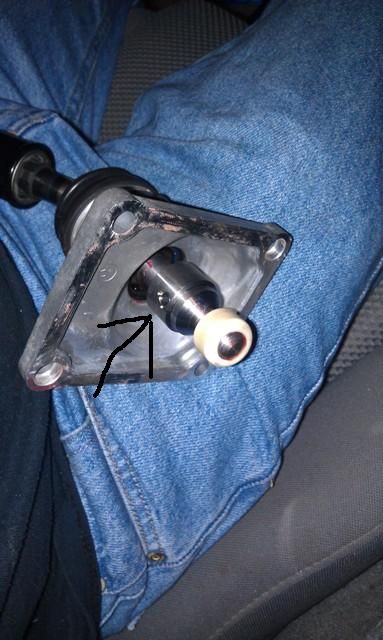
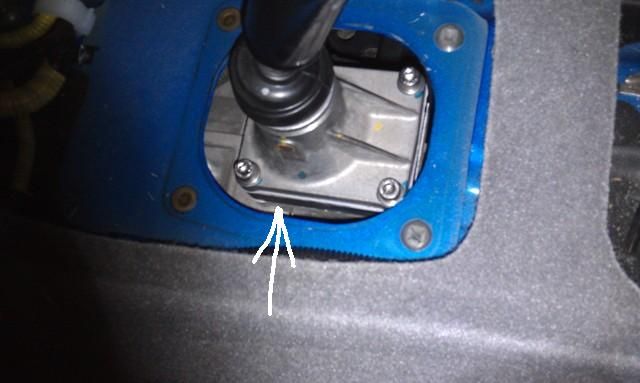
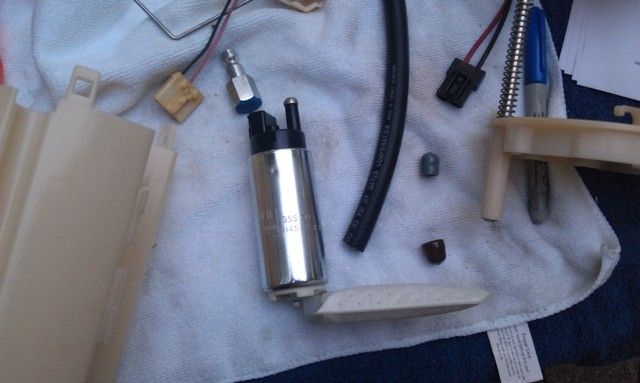
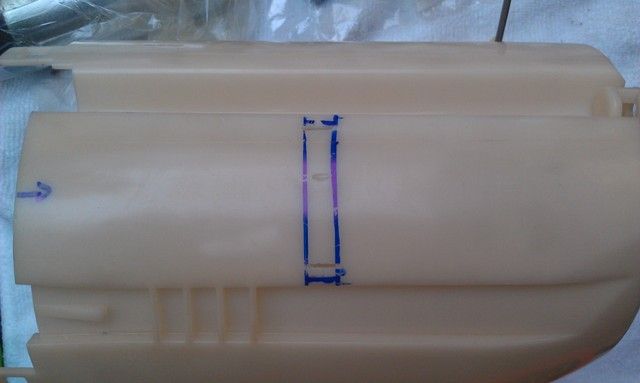
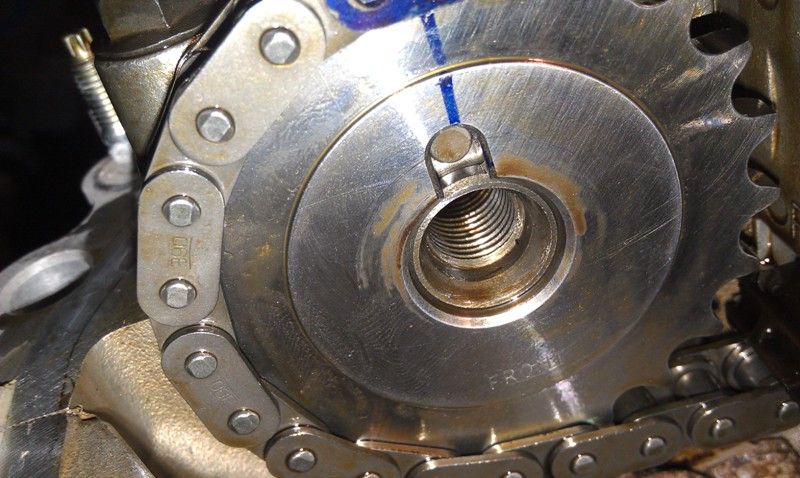
ok you can see the fuel pump. ( Make a note for your self before removing that ring. notice the black dot i have there in pic, thats only the photo...on my 08 model i had this extra alignment mark so it gave the Tech to install this back where it was before removal you can see the arrows also is for that alignment that ring alignment must be in between those arrow marks when u get it tight..If you do not have that, just make your self a mark on the ring and on the tank...Now if you don't have that toyota special tool to remove that ring, you can use some realy large chanel locks..i used a flat tip screw driver ( a good size flat tip) and malot...before i got this far, theres is a black cover that must go back on it and the wire harness and fuel lines i took off. Theres 2 yellow clips that hold the fuel lines in...pull them all the way out and wiggle them off..just make sure not to get splashed in the face i used a towel to cover them as i pulled them up.....before u do all this( unscrew the fuel cap to releive the fuel pressure.) there is a discharge procedure to do to releive fuel...if you want to do this ,be all means. My way was a lot quicker than that and it releive presssure from the tank and lines...there will be some fuel coming out of the lines that is normal! (not a lot of fuel, onces u start working on the injectors there will be fuel up there doing it my way... your engine will be cooled of by this time. i used rages to sock up the fuel).
IMAG0100.jpg

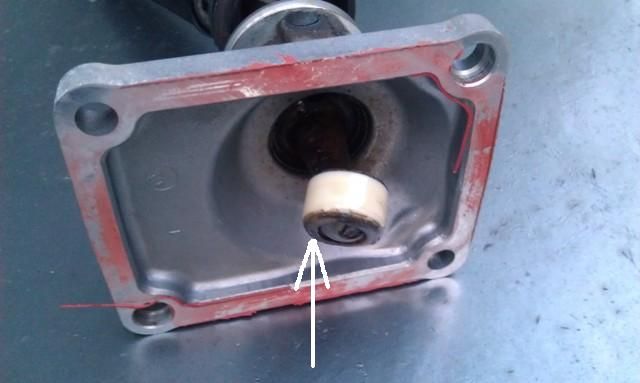
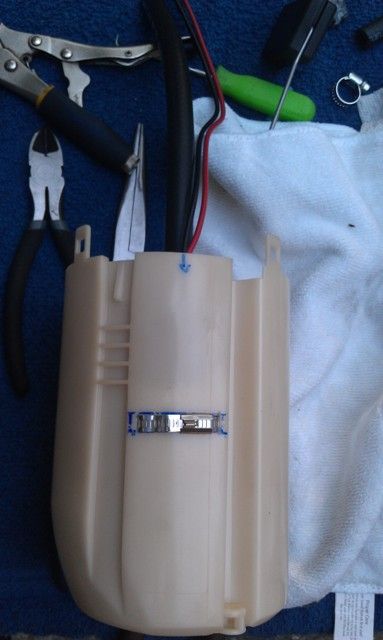
Ok you can see the pump out and i disconnected the harness from the pump top. OK u can see that you will get the instruction to this. im not realy goingt o talk much about how to do this just give you photos, so i don't bore you to crap! it just takes some time to do. tools i used was a drimel tool with a saw wheel bit that work great for me. wire tool, flat tip, used a air hose adapter where it was the correct size to put on this clip ring for the filter...use what u may have, but its good to put on level..
IMAG0105.jpg

IMAG0103.jpg

IMAG0104.jpg

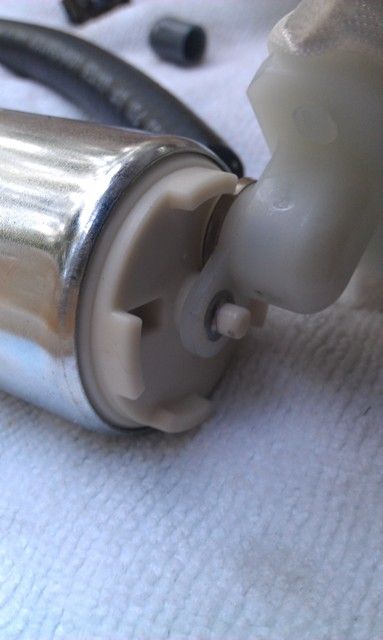
Make sure that the rings beveled end is facing down to the tip, so it locks in place!
IMAG0102.jpg

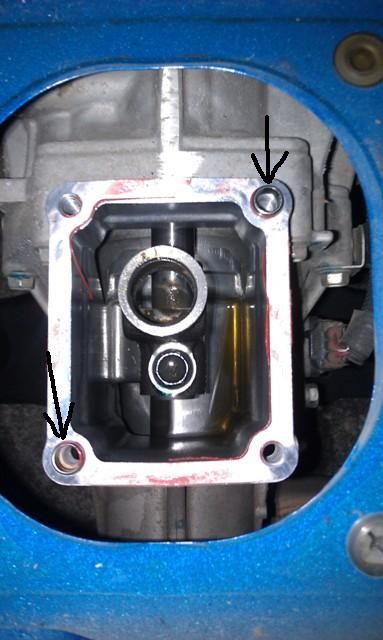
the instructions will tell you how to do the measurements and where to cut at...thats what those little slots are from my drimel tool so u can run the band threw!
IMAG0107.jpg

make sure your filter not get in the way of that flap. also make sure pump is all the way down and pressed to the wall of the pump housing...so u can get the band to be tight around pump. before you do this put on the hose and harness in make hose is tight on the fitting. so not leak past hose and you lose some pressure.
IMAG0106.jpg

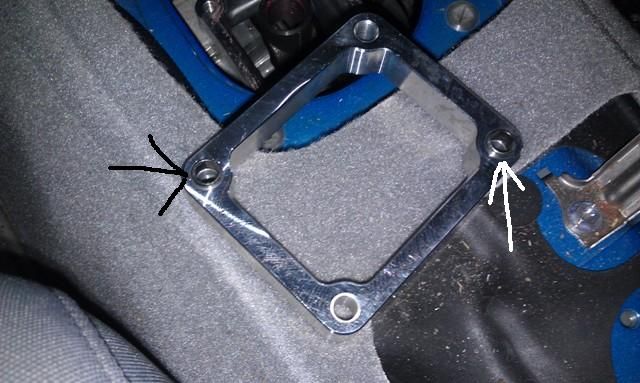
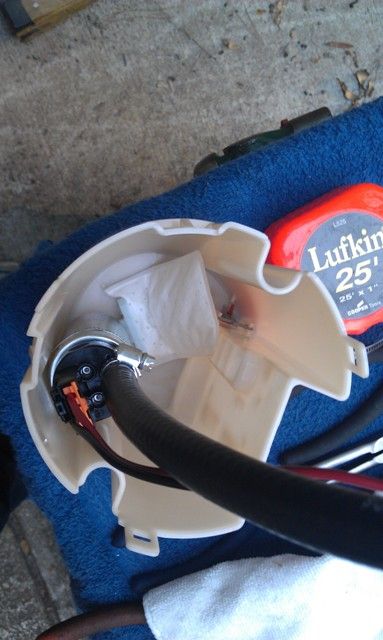
you can see the band is around it now and tight and cut off the excess!
takes a bit to get it tight, it is good to get it tight so it does not bounce around in there. theres some other pics i did not take. but the instructions will explain all for you. there a high pressure hose u must cut off to be able to put that new fuel hose on. At the beginning of the fuel pump u see on the table...theres a real skinner hose thats hard plastic, that will come off with the removal....you will not put that back on...there is more to due but im not boring you with it.....Then once you get it put together just reinstall the pump and everything back together in reverse order!

Rob....scouts out
 
Last edited:

RRX

New Member
Joined
May 22, 2012
Messages
335
Reaction score
0
So far great write up. Keep it coming I have to all this in 2 weeks. I can't wait I am so damn excited to be boosting soon.
 

scoutdeed69

New Member
Joined
Mar 8, 2011
Messages
222
Reaction score
1
when u do it will feel great thats for sure...i talk to gadget the other day about the ones using the UCON system and they are working on the software to be able to read whats going on with the system and you should be able to do some stuff with the UCON, but with a limit... so you do not mess up you engine with the programing, cause the system is already automated adjustment...but if your going to need to update the UCON cause you did something major you will need to send it to him so the can make the changes...also becuase they are working on this set up. i will need to send mine in, so they can install the the new software in, so i will be able to use my lap top for readings. or a readable system where i don't need a laptop!

Rob...scouts out:rockon:
 

scoutdeed69

New Member
Joined
Mar 8, 2011
Messages
222
Reaction score
1
well heres the part for the cam gears... it sound harder than it is realy!
IMAG0109.jpg

well every one already knows how to remove the cover...will maybe 60% of us know how too!
IMAG0110.jpg

right now just giving you what you will be pulling apart to get to the cam gears!
IMAG0111.jpg

Just some more photos of it!
IMAG0112.jpg

If i was taking my vehicle apart i would take some photos of it if i did not know where that part came off of! ( Thats just a hint).

IMAG0113.jpg

you see those brackets on the intake plinium. well they need to be removed so u can take that big intake off!
IMAG0114.jpg

In this kit u get the UCON computer, the cam gears, and the thermostat and the hard wear for it! After every installation it tells you to start the engine to make sure no leaks and so on...well because your installing the whole kit...well at least i did....i did not need to start the X up after every installation...cause i new that if i did it would take a lot long to install...cause you would have to pull everything apart that u just had apart...so don't wast your time doing that...just do it right and 'GIT R DONE"!
IMAG0115.jpg

Ok, you can see that i have removed the throotle body..u do not need to remove the little hose's from it during your whole installation ok..."I did it, so can you"! see I'm removing the plinium bolts, disconnected the injector harness, coils harness is removed the connectors you can see in the photo needs to be removed its sensor! Ok behind the vacium canister u see some hose's there theres a special clip attached to a bracket... need to seperate that..also theres another one down below that..that one is a little harder to remove...if u look real close to the sensor on the back of the intake to left of this photo, in front of the vacium canister..its realy hard to see it on a phone but, right behind that sensor is a thick harness that needs to be seperated...i tried and tried to seperate it on the bottom of that clip..i could not get it loose...so what i did was is where it folds over u can see the attachment of it...so i seperated it there without breaking it so i could reuse it, just lay it down pull harness over it and fold it back over the clip...its a little triky but it work for me! Just make sure those brakets are off and clips and hose are disconnected from intake! YOU WILL GET THE PAPER INSTRUCTIONS ON SOME OF THIS....NOT ALL, ITS GOOD TO HAVE A TOYOTA MANUAL HANDY, GIVES GREAT PHOTO OF WHAT IT IS SUPPOSED TO LOOK LIKE!. the manuals are not cheap bought some from toyota over 100 each and theres 4 volumes of it... i only have 2 of them!
IMAG0116.jpg

Ok the intake is off, now for very fun part of this process! woohoo :giggity::giggity:
like the other side just start taking the harness off the injectors and coils and seperate harness from top of the valve covers i would stick some towels in the intake so no dirt or anything else gets in there! I used my long needle nose to help remove harness for valve cover. On the diver side main harness you can see that it drops down toward the alternator..i remove the harness from it and just used a bungie cord to hold the harness back far enough to be out of the way to remove the valve cover.
IMAG0117.jpg

the 1 braket you see hanging there i could not seperate from the lines..it was all unbolted, but it had a stud in the center of it... so it made it harder to move pass the lines...well i did not want to bend my lines or disconnect them, so i left it there it was out of the way....so was no need to do all that. ( In this photo you can see how the hoses connect to the intake i took off earlier) Don't loce that hose and clips that is on the valve cover, you will re-use it in the same place!
IMAG0118.jpg

Just another photo of it!
IMAG0119.jpg

different angle of it!
IMAG0120.jpg

This photo is just to show what it looks like in side!
IMAG0121.jpg

You can see here that the new cam gear is installed...I will explain about it! the front bolt u need a 17mm box end wrench and a 24mm wrench to fit on the cam itself, where it looks like its a bolt design! I am going to say this it was realy hard to break loose that 17mm bolt, my wrench i use was a long handle 17mm box and a 19mm box end wrench from snap on, its a one piece wrench! the 24mm is from snap on and its also long too! you can use 2 wrenchs if needs be or a pipe to help with leverag! i used some gloves for more control and to help in prying it loose as it will hurt your hands. i'm not extremly strong but, but it took me a few tries at it before it broke loose...before even breaking the bolt loose...PLEASE PLEASE put you motor in time before you do this...i turn my motor over several times ( turn engine clockwise not back wards) to make sure i had the right timing set! you can see my mark on the chain and the gear....in the instructions it say's to mark it so u can put the new gear in place...its a little challenge for anyone to do this but its worth it! theres a tentionor there bolted down with a 12mm,just remove the bolt to help in removing gear and install of new gear...(u don't need to remove tentionor)...(THEY SAY DON'T LET THE CHAIN COME OFF THE INTAKE CAM GEAR) REASON IS THAT IF YOU DO, U JUST LOST YOUR TIMING SET UP..AND YOU WILL HAVE TO RESET YOUR TIMING! SO I PUT IN A TOOL JUST BIG ENOUGH TO PUSH AGAINST THE HEAD AND THE CHAIN..LIKE A SCREW DRIVER OR SIMULOR TO IT! But make sure it is big enough not to fall inside the motor too! I did it for both sides...the passenger side is smaller! so i used something a little smaller to fit! make sure to put something in the BOTTOM OF THE GEARS, A PAPER TOWEL SO NOTHING WILL FALL INSIDE THE MOTOR! Ok thats it for now .... i will be posting more soon, getting tired at about 0525 in morning! Oh almost forgot to say depends on your millage on the engine I would purchase some valve cover gaskets and the intake plinium gasket...cause the heat kills the rubber makes it leak, by making it hard...so i purchase new seals!

Rob....scouts out:rockon:
 

scoutdeed69

New Member
Joined
Mar 8, 2011
Messages
222
Reaction score
1
Ok back at it again!
IMAG0124.jpg

you can see that this is the passenger side head! well theres things you need to know before installing your cam gears...Start on the driver side head, the color mark on the chain is where the timing mark is on the head, The new gear will have a dimple in it and the front of the gear say's front, meaning to have it face away from the engine...looking towards the radiator! they used a line to the dimple for the gear so when u install it makes it a little easier to line up correctly like u took the old cam gear out..also you will need to wiggle the gears to come out and new ones to go back in.....also this other picture below shows in the center of it a pin on the cam its self....thats the alignment pin for the gears...once u get everything in position for alignment there gear may not go all the way on ( make sure this lines up correctly or u could push that pin in the cam, where as the cam will be useless and u may need to get a new one, if u can't get the pin out!) just rotate the cam just a very little of amount of movement ( like a wiggle either way) to get that pin to line up with the gear! Now you can bolt the gear back on. I would use a crows foot of a 17mm with your torque wrench! Do not, I say agian Do not use a cheap crows foot you get from harbor feight...i would use one from snap on or some one you know will not break when torqueing it...mine did and Boy I though I broke the bolt..only seeing the crows foot fly up in the air...I ended up using a pip for more leveage so i get a good torque on the bolt!

IMAG0123.jpg

The passenger side is a little tougher than the driver side was. This is the driver side gear...
IMAG0122.jpg

This pic shows the pin aligned and the word FRONT you should see when installed! ONCE gear is installed just reinstall the tentioner to torque specs...good happet should be to torque everything back to its stock reading's! just clean the valve cover and the matting surface's and reinstall your new valve cover gasket! Put valve covers back on back on...while u look at the surface while cleaning u will see some sealant on the top near the front of the head where the front timming chain plate meet up...please put some new sealant there so u don't create a oil leak in that spot once you install you covers...after I installed the gears and tighten them up I installed the new spark plugs!
IMAG0125.jpg

you can see in this photo of the thermostat housing removed...theres instructions on the process of replacing it...and moding the housing so you can us the URD kit! best way for me to get the old thermo out was to use a set of pliers to push down on it and turn the thermostat to remove from its clamp holding it in place. those clamps you will need to remove and make smoothly so the base will fit flush with the thermo housing! sorry i did not get any photos of this!
Make sure that you pull out the paper towels so it does not mess up you motor!!!
IMAG0126.jpg

you can see in the photo, valve covers on and torque down to specs... the new injector harness's in place and the new injectors in place..the rail is just unbolt and carefully lift the rail up making sure not to bend the rail and making sure injectors coming out with the rail...all i did was just wiggle each injector out 1 at a time and replacing it with a new one...starting with the closest one to the front of the X! you will reuse the base of the injector seal...just make sure its clean as you put them back in place! you can see in the back of the rail is where the fuel regulator is...in the stage 3 kit you get....u will need to install that adaptor in between the rail and the regulator...fuel will come out if you remove it...unless you did the fuel pump like me you will get fuel...other wise you did it the way in the manual of discharge of the fuel pressure system! you will also need to install the braided fuel line and make sure its tight when you install it so you do not get any fuel leaks cause once the whole kit is on its hard to see if is leaking! you do not need to put any sealant on this fitting...its a flar fitting so it is design to seal it! you also see the hose fitting on the valve cover, well that hose will not be reused! In the kit you will get a new hose to fit on it, i just re-used the stock clips to keep it from coming off!
IMAG0127.jpg

this is the driver side!
IMAG0128.jpg

the injectors connected and the Harness re-installed back to its rightful place! The MAF sensor harness is going to be seperated from the wire loom so you can extend it to the new location on the intercooler piping! from here just go ahead after you moded your thermo housing just install it back!
 

scoutdeed69

New Member
Joined
Mar 8, 2011
Messages
222
Reaction score
1
Ok, here's the thermo getting in stalled... with the tool i used to remove the housing and the install! its a 1/4 10mm swivel socket with its extention!
IMAG0133.jpg

Ok what you don't see is i removed the studs because they are to short for this kit... if u have a stud remover great it will help...but i used 2 little 10mm nuts and faced them together to make it tight on the stud... well that did not work cause was not enough of a bite when tring to remove it...so i had a hand held tourch to help to loosen the metal from the bolt as the bolt is steel and the base is aluminium...where as the aluminium expands faster then the steel! so once i got it hot enough i was able to remove the stud! just becareful with the heat to not melt anything as of sensors and harness! you can get the torch from lows, homedepot..or one of the part stors....i have the one you can just turn the nomb and pull triger to fire it up...just lower the flam so not to melt anything!

Rob...scouts out
 
Last edited:
Top Bottom