MXXN
New Member
- Joined
- Jan 15, 2007
- Messages
- 289
- Reaction score
- 1
I just purchased my Ride Control off Amazon.com. I read prior that there were some clearance issues so I figured I snap a couple pics for future reference.
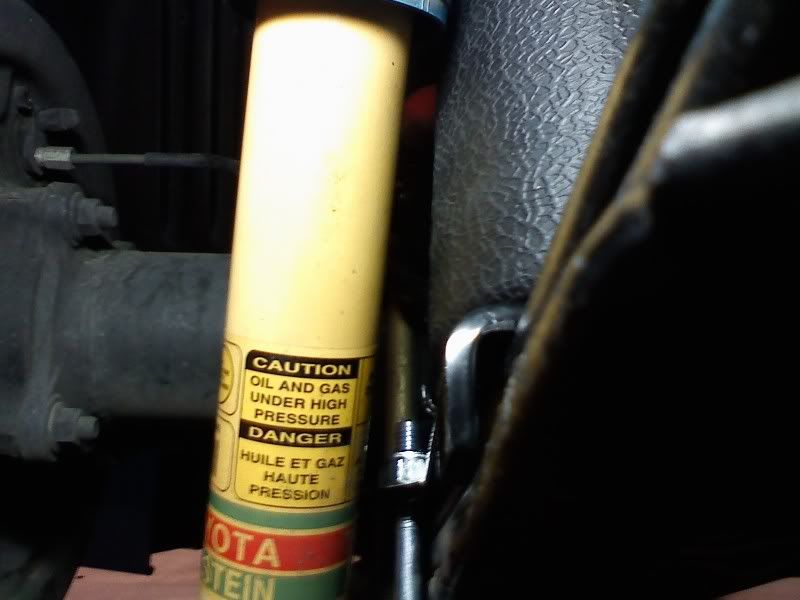
The main issue is the air bag hitting the rear sway bar.
What it is. Air Assist system to increase load capacity when towing or carrying heavier loads in the bed
Who makes it http://www.airliftcompany.com/
Part Number 59564...for Tacoma (they list it as fitting the X-Runner)
Instructions http://airlift.iwebcat.com/imgVD/AIL/MN-656_59564.pdf
Tools beyond whats listed
Right angle drill (not necessary but helpful)
Drill Press (makes modifying the plate easier)
Counter Sinking Drill Bit (1"X82*)
The instructions are pretty straight forward so I will not spend much time on step by step just show a couple images and notes on modifying the kit so it fits like it should
Please note, I have contacted them with pictures and hope to possibly prompt some changes. I think someone at the company dropped the ball and didnt realize the X had a rear sway bar. You'll see why in the next 2 pics
Pics showing clearance issues.
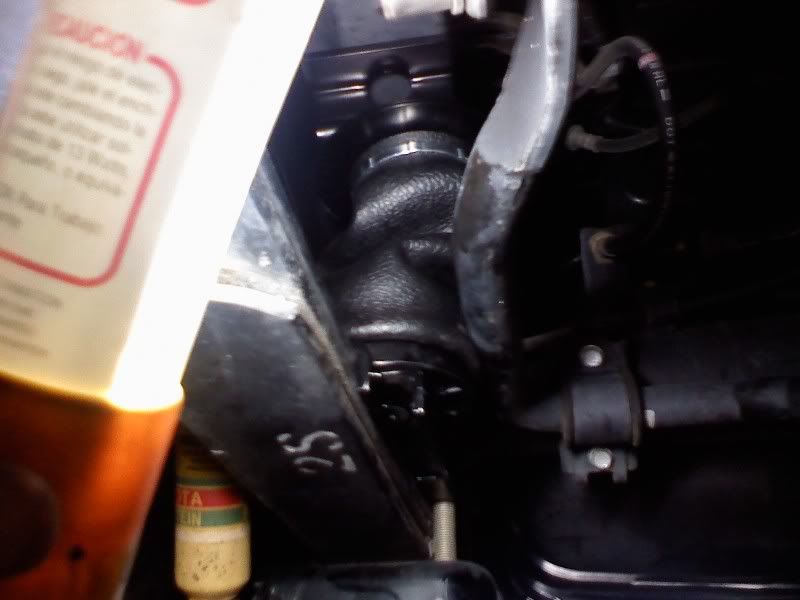
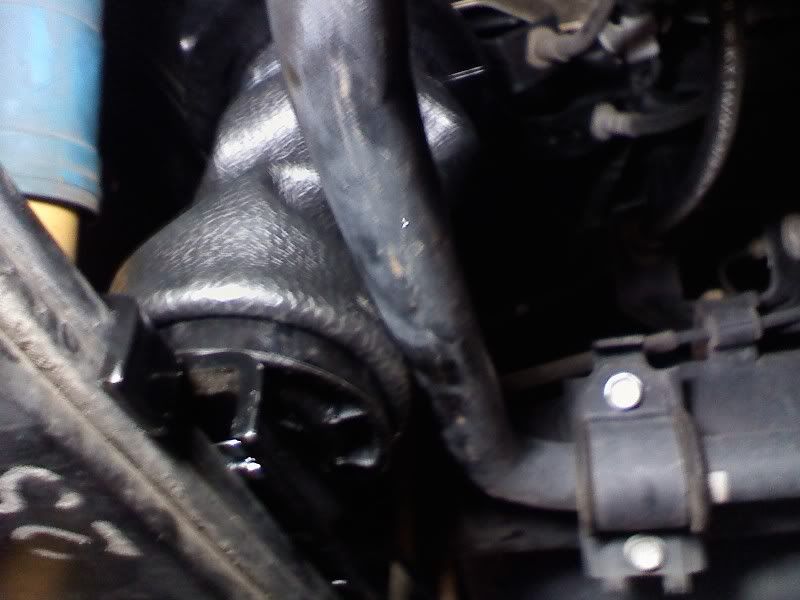
In the Above photos the system mounts up but it is very snug against the bar and doesn't even have air in it yet
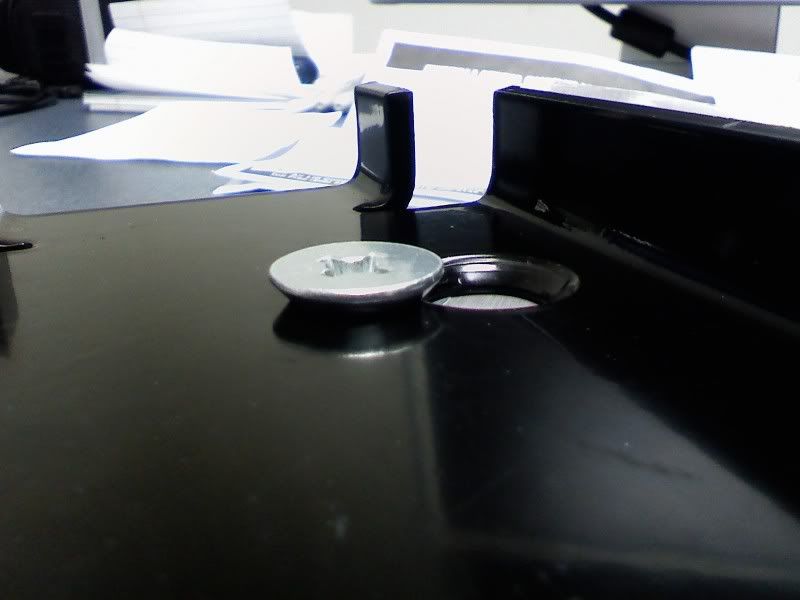
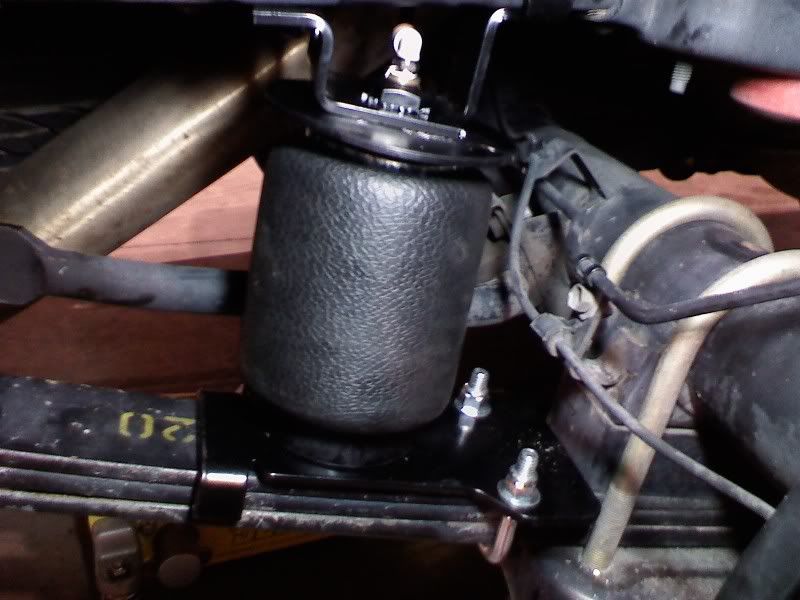
Below are pics of what I modified on the kit to make them work. The large plate mounts the bottom of the bag to the trucks leaf spring. It use a large 1/2" bolt with a countersunk Philips head to mount the bag to the plate. This is the hole I relocated.
WEAR SAFETY GLASSES!!!
You will need to drill a new hole for the lower mounting bolt plate. This hole is approx 3/4" from old center to new center. Doing it again I would push it over to 7/8" center to center
Measure your plate and center punch it. I need a 1/2" hole so I started by drilling a 1/4" pilot
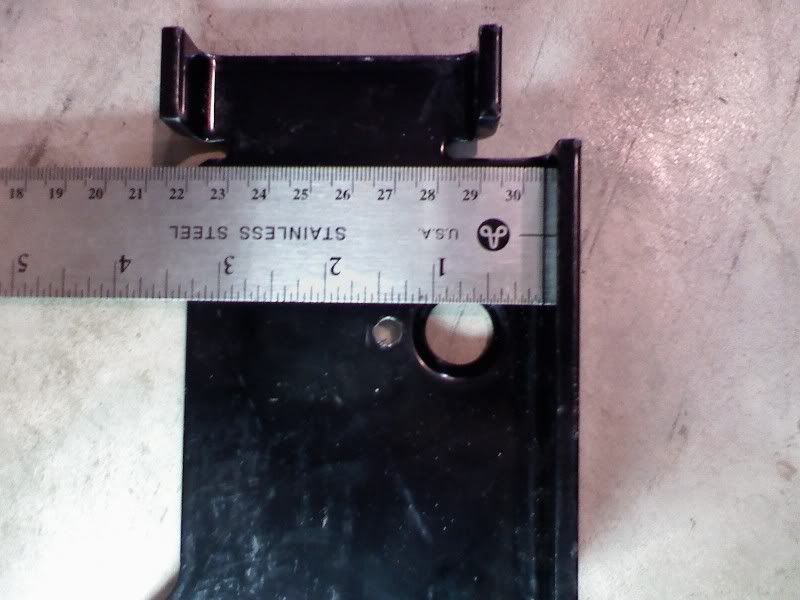
After my pilot hole I openned it up to 1/2" so the bolt fit thru
The bolt hole will then need to be countersunk. This bit may be something you can't find at your local franchise hardware store and may need to get it from a specialty store or a source like Grainger or McMaster Carr. Using a drill press to handle this make for a cleaner finished product. It can be done by hand.
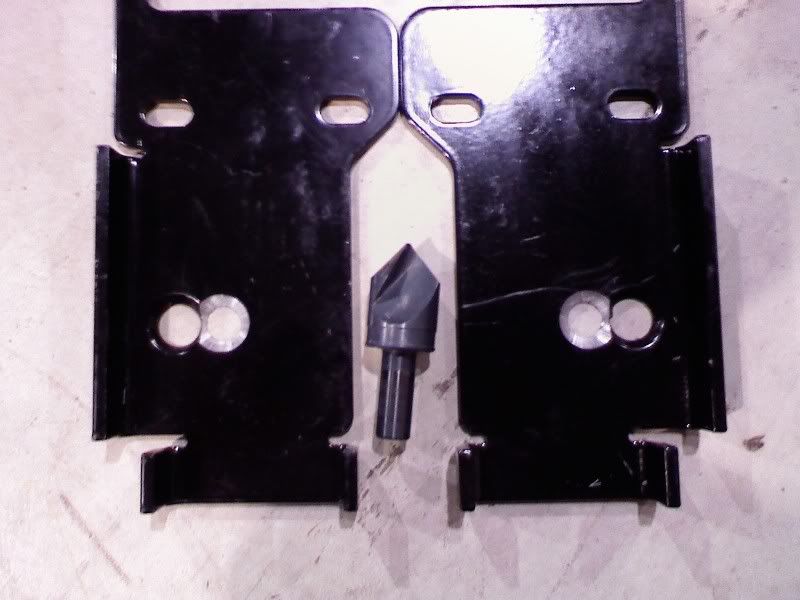
The top mount is "slotted" so it offers enuff adjustment to center the top mount nut over the bottom nut. This will keep the bag from inflating and canting to one side or the other. Its not rocket science so it doesn't have to be precision perfect.
Slotted top mount
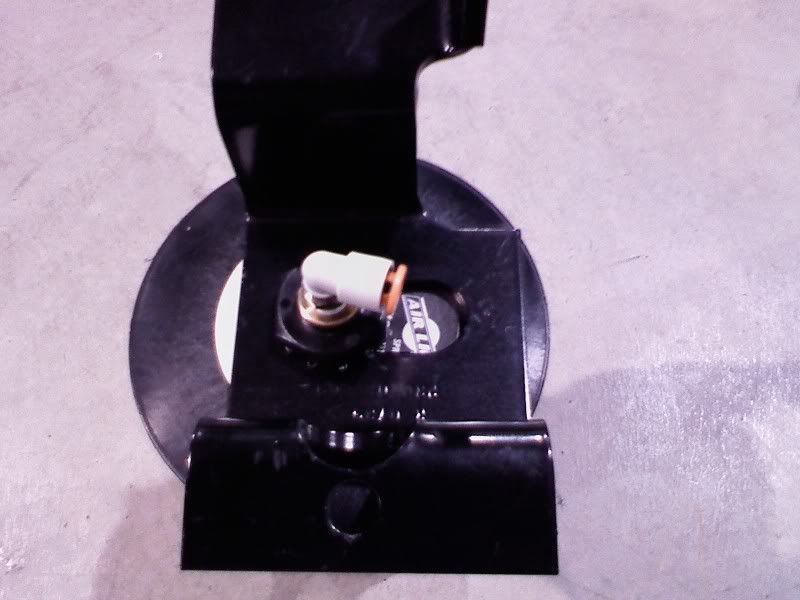
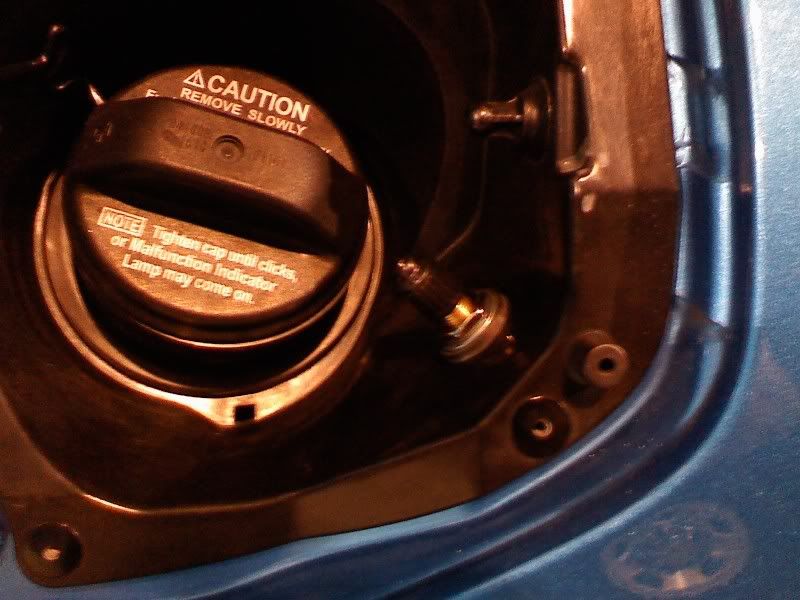
The system is provided with 2 shrader valves so you can fill each bag up independently. I didn't want this option so I just ran 1 shrader valve to the gas filler compartment and T'd off the airlines so both bags fill at the same time.
Here is the clearance i have now with the bags at 60psi which is way more then I will prob ever need them at. Note that the swaybar has drifted over towards the bag about 1/8th-1/4". You can see the clean/dirty line at the swaybar mount. This happened when I dropped the endlinks so I could drill the top mount holes in the frame easier. I repositioned the bar back to where it rides and have 1/4 of clearance now. There could possibly be more if I would have drilled at 7/8" center/center like I mentioned above. I felt that it would offset the bottom to the outside to much that I could compensate on the top mount and the bag would sit crooked.
Drivers side clearance is not as close as the pic makes it look:top:
This is a fairly easy and straightforward install done on the floor with jackstands. They say less then an hour install time but it took me more like 2 till I ran my airhose in a clean way and modified and test fit the plates. I recommend test fitting everything prior to the start of the install since this will give you a better idea what your after.
Installed and inflated to 60psi on passengers side
The main issue is the air bag hitting the rear sway bar.
What it is. Air Assist system to increase load capacity when towing or carrying heavier loads in the bed
Who makes it http://www.airliftcompany.com/
Part Number 59564...for Tacoma (they list it as fitting the X-Runner)
Instructions http://airlift.iwebcat.com/imgVD/AIL/MN-656_59564.pdf
Tools beyond whats listed
Right angle drill (not necessary but helpful)
Drill Press (makes modifying the plate easier)
Counter Sinking Drill Bit (1"X82*)
The instructions are pretty straight forward so I will not spend much time on step by step just show a couple images and notes on modifying the kit so it fits like it should
Please note, I have contacted them with pictures and hope to possibly prompt some changes. I think someone at the company dropped the ball and didnt realize the X had a rear sway bar. You'll see why in the next 2 pics
Pics showing clearance issues.
In the Above photos the system mounts up but it is very snug against the bar and doesn't even have air in it yet
Below are pics of what I modified on the kit to make them work. The large plate mounts the bottom of the bag to the trucks leaf spring. It use a large 1/2" bolt with a countersunk Philips head to mount the bag to the plate. This is the hole I relocated.
WEAR SAFETY GLASSES!!!
You will need to drill a new hole for the lower mounting bolt plate. This hole is approx 3/4" from old center to new center. Doing it again I would push it over to 7/8" center to center
Measure your plate and center punch it. I need a 1/2" hole so I started by drilling a 1/4" pilot
After my pilot hole I openned it up to 1/2" so the bolt fit thru
The bolt hole will then need to be countersunk. This bit may be something you can't find at your local franchise hardware store and may need to get it from a specialty store or a source like Grainger or McMaster Carr. Using a drill press to handle this make for a cleaner finished product. It can be done by hand.
The top mount is "slotted" so it offers enuff adjustment to center the top mount nut over the bottom nut. This will keep the bag from inflating and canting to one side or the other. Its not rocket science so it doesn't have to be precision perfect.
Slotted top mount
The system is provided with 2 shrader valves so you can fill each bag up independently. I didn't want this option so I just ran 1 shrader valve to the gas filler compartment and T'd off the airlines so both bags fill at the same time.
Here is the clearance i have now with the bags at 60psi which is way more then I will prob ever need them at. Note that the swaybar has drifted over towards the bag about 1/8th-1/4". You can see the clean/dirty line at the swaybar mount. This happened when I dropped the endlinks so I could drill the top mount holes in the frame easier. I repositioned the bar back to where it rides and have 1/4 of clearance now. There could possibly be more if I would have drilled at 7/8" center/center like I mentioned above. I felt that it would offset the bottom to the outside to much that I could compensate on the top mount and the bag would sit crooked.
Drivers side clearance is not as close as the pic makes it look:top:
This is a fairly easy and straightforward install done on the floor with jackstands. They say less then an hour install time but it took me more like 2 till I ran my airhose in a clean way and modified and test fit the plates. I recommend test fitting everything prior to the start of the install since this will give you a better idea what your after.
Installed and inflated to 60psi on passengers side
Last edited:
") I don't want a tricky compressor system or any on board pumps. Im just using a high quality hand held mountain bike pump. I can have the system to 30psi in less then a minute.
I don't want a tricky compressor system or any on board pumps. Im just using a high quality hand held mountain bike pump. I can have the system to 30psi in less then a minute.