HiTek21
New Member
- Joined
- Apr 12, 2007
- Messages
- 1,197
- Reaction score
- 0
Disclaimer: This is for information only. Any bodily injury or damage to your property is at your own risk.
This installation was done on a 2007 Tacoma X-Runner with the factory 6 Disc in dash CD Player. These instructions may or may not work on other Toyota vehicles. Contact USA Spec to verify if this item will work with your current radio. These are general installation instructions for the Tacoma so it should work with other brands of Ipod adapters such as peripheral Ipod2Car, IPac, etc... (just verify that it is compatiable with the 05+ Tacoma)
Installation Time
45 minutes - 60 minutes
Difficulty
3 out of 10
Tools Needed
3/8" Extention
10mm Socket
3/8" Ratchet
Thin putty knife (or something thin/flat and wide)
Philips head screwdriver (if you are installing in the center console.)
Overview
USA Spec PA12 Toy allows you to connect your IPod to the factory radio giving you the best sound quality possible. Toss out your old FM modulators because this will blow you away. To answer your questions that most of the other's answered for me (thank you to stevenredx, hiflyer, iski, jacksonj for answering all my ?'s) the USA Spec will do the following
-Charges your Ipod (continues to charge after ignition is off and pauses the song, so it should shut off eventually)
-Controls your Ipod through the factory radio and steering wheel controls (very limited though)
-Displays Text to a certain extent (sometimes songs may not display text for unknown reasons)
-Allows you to connect 1 auxilary device (RCA connection)
-Put it in Hybrid mode allows you to play Playlists or select songs on the Ipod like normal.
http://www.xr-underground.com/vb3/showthread.php?t=5002 My original thread asking ?'s
Some other useful information
- Dipswitch 1 On = Aux Enabled (Off = Aux Disabled)
- Dipswitch 2 On = Hybrid Mode (Off = Direct Mode)
- Dipswitch 3 & 4 should remain on
-The PA12 supports up to 5 playlists, the 6 spot is set for Aux.
-Playlists must be labled Toyota1 - Toyota5 (i.e Toyota1-MyFavorites)
-Playlists will show up like a CD changer and you change it like you would change a CD.
-Text will only display a certain number of characters (12 - 15), press the text button to switch between artist and song title. If your text is too long for the screen to display hold the text button down for 2 seconds and you will hear a beep. The headunit will display the remaining characters. Hold the text button down for 2 seconds and it will switch to the first half of the text.
Repeat is not supported
Toyota service manual on how to disassemble your center console / shifter area for both Manual and Auto transmission.
http://www.ncttora.com/fsm/05+/data/ileaf/06toyrm/06toypdf/06rmsrc/rm2006ta/06000.pdf
On to the write up
Here it is in all it's glory, the USA Spec PA12-Toy Adapter. I ordered off of Ebay for $149 + Tax(since I live in CA) with free shipping. It can be purchased through Crutchfield and some electronics stores. Sorry I didn't take a picture of all the wires and such but it should come with
-1 USA Spec PA12 Adapter
-1 IPod Connection Cable
-1 CD Changer Cable
-1 CD Changer Y Cable Adapter
-1 Bag of self tapping screws
-Instructions and other misc papers.

First step is to remove all CDs from the CD changer (instructions specify since you may be disconnecting the power from the changer and it could screw something up when you plug it back in.)
You should cover up the shifter area with a large soft towel to prevent scratching of the plastic console. You don't need to but keep in mind the plastic scratches up very easily.
Next you will need to remove the A/C controls. This is where you need the thin flat putty knife (or similar thin and wide is best). I masked off the area underneath to prevent any scratching, again you don't need to but don't say I didn't warn you.
Take your putty knife and slide it on one end of the A/C control and carefully pry it off, once you pop one end off work on the opposite side. It came off very easily for me so don't use too much force.
Becareful not to stick the putty knife too far in or you might break something.

Once you pop the plate off you will see two wiring harnesses behind it, unplug the two harnesses and set the A/C Controls aside.

Behind the A/C Controls you will see 4 10mm bolts. Simply remove them with the 10mm socket (you may need the ratchet extension)

Once all four bolts have been removed you can remove the radio. It is still being held in place by 3 clips at the very top of the radio. For this you need to pull the radio straight back toward the rear of the cab carefully and it should pop right out.
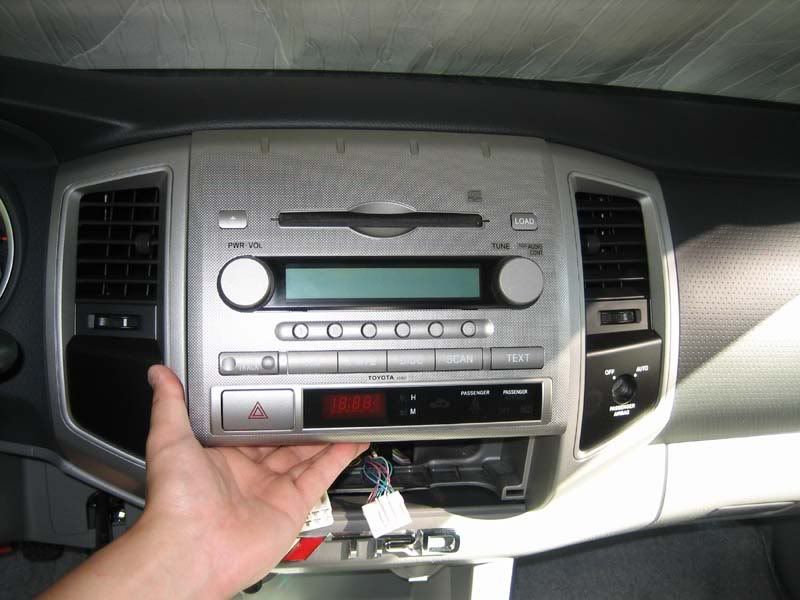

There are a lot of wiring harnesses behind it connected to the radio. Now depending on what kind of install you want to do (Hidden in the glove box, hidden in the center console or exposed) you might need more space to work. I disconnected all the harnesses and put the radio aside so I could work better.

I chose to hide the adapter under the cupholder and feed the ipod cable through to the center console box. If you choose to stash it in the glove box or someplace else then you can skip these next few steps but you'd need to figure out how to get the cables through and a place to stash the adapter.
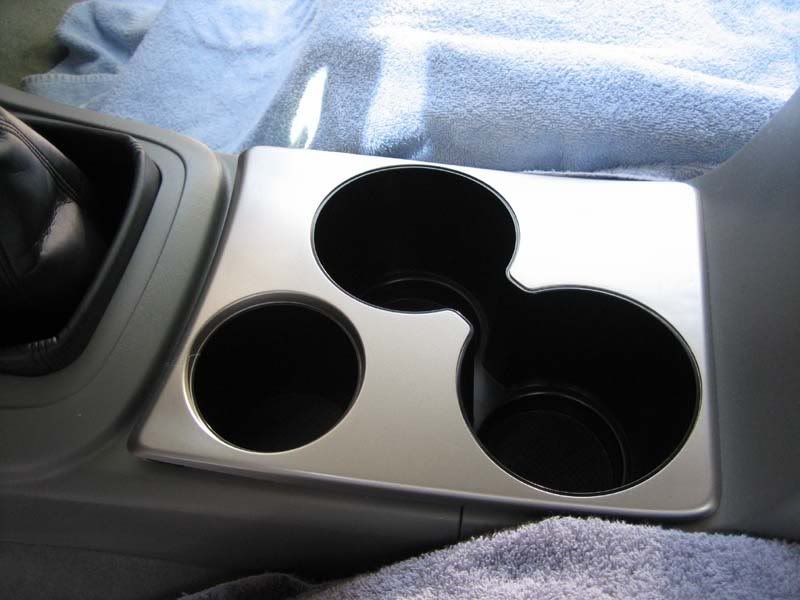
Remove the cup holder by lifting it straight up. There are 4 plastic clips around the cup holder that hold it in place so becareful not to break them. It should pop off easily.
Remove the carpet from the center console box and expose the 2 x 10mm bolts.
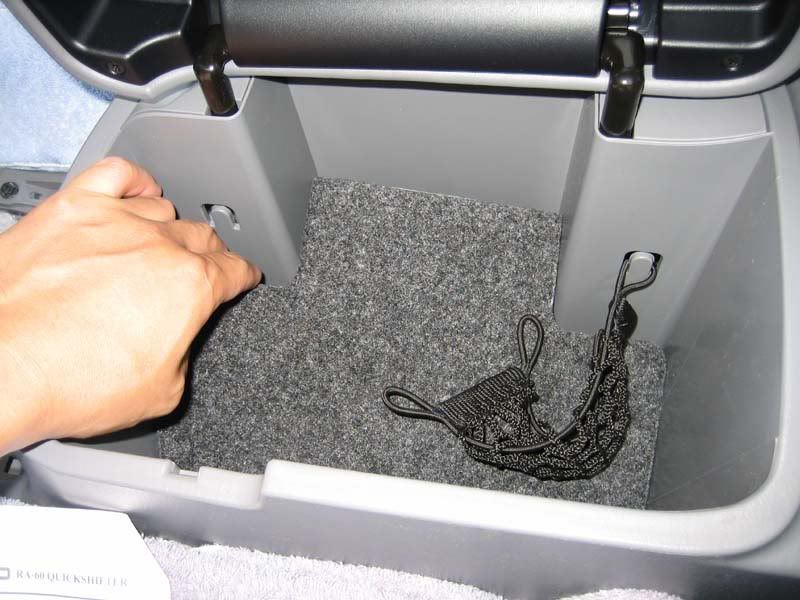
Remove the 2 x 10mm bolts and store them safely
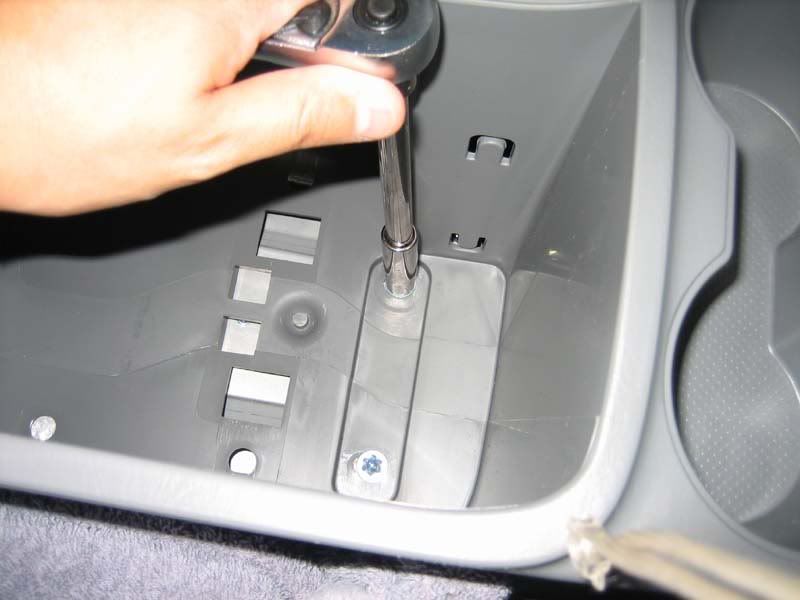
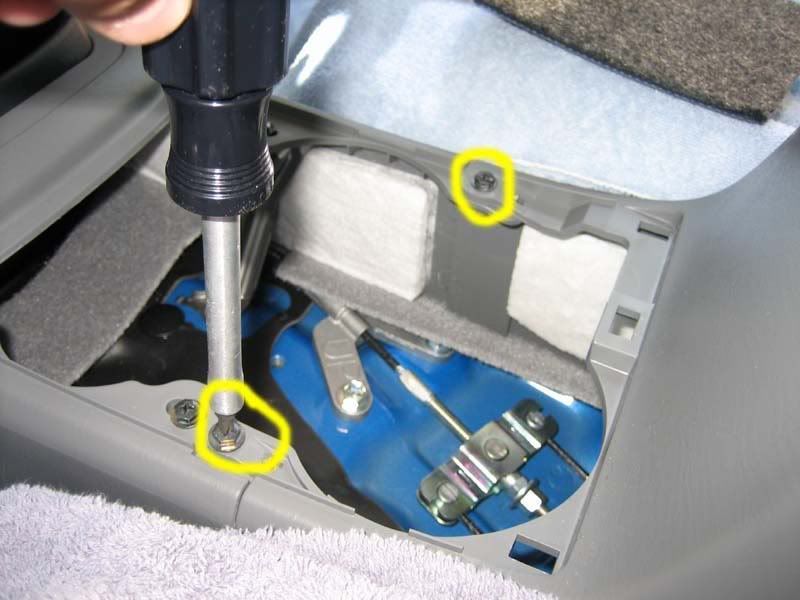
Remove the 4 philips head screws from under the cupholde, there are 4 but I only circled two.
For this step you can undo the center console and just lean it back since you will just be running the cables through. There are 2 hooks on each side just undo it, lift up, and pull the console off.

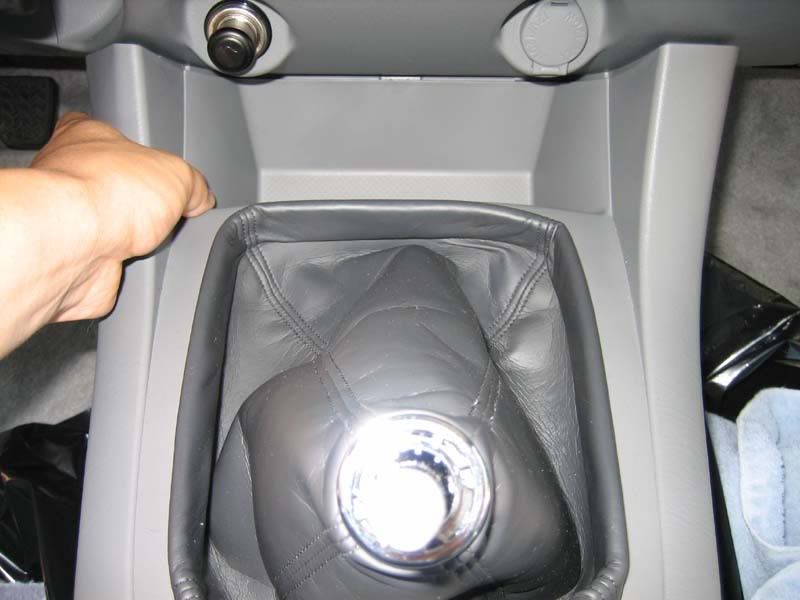
Unscrew the shift knob, put it in 4th gear, and pull the gear box/boot off by pulling it straight back towards the rear of the cab. There are 3 clips holding it in place.
Now that you've gotten the whole center console apart you can start installing the Ipod adapter.
I fed the CD Changer cable through the dashboard to reveal it at the bottom where the gear box cover was. It was rather difficult but I found that if you feed the round connecter from the top and use your other hand to receive at the bottom while pushing the plastic foward to make room for the cable, it will feed through easier.
I'm sorry I can't really explain it in detail better because once you get in there it might make a little more sense. But here are the end results.

Now that you have the cables fed through the rest is pretty much plugging it together. I ran the cable through the center around the shifter and connected it to the Ipod adapter box. You don't need to screw the adapter down, I just tucked it underneath that little piece of carpet and I've never heard it slide or rattle.

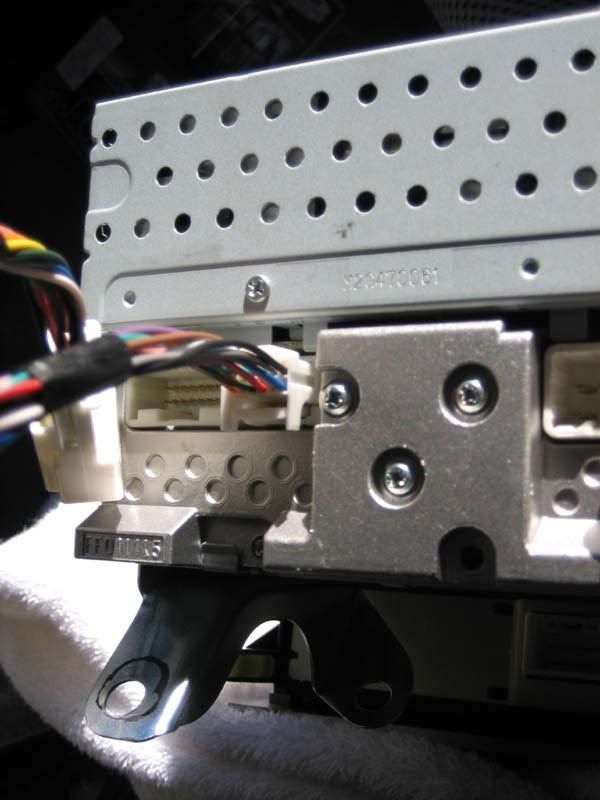
Plug the Y-Cable into the upper end of the CD Changer cable (the square connecter) and plug the male end of the y connector into the back of your radio.

After you've got that part installed you can connect the rest of the cables back together and reinstall the radio. Just make sure you connect everything back, I forgot to plug the steering wheel controls and I had to take everything apart again. Just plug the all the harnesses in and put the radio back in. Don't bolt it back up yet because if the Ipod adapter doesn't work you may need to fiddle with the connectors.

Don't finalize the install yet. Connect the ipod cable into the USA Spec adapter and test things out first to make sure everything works. Hopefully everything works without any problems.
Viola a fully working Ipod on the stock Toyota radio. Displays the text, charges, and pretty much anything else you can think of.

Now that I know everything works I finished everything up. I took the small connector off that goes into the USA Spec adapter and fed it through one of the small holes at the bottom of the center console and wired it up. I also got an RCA to headphone jack cable and wired it up, now I can connect any media device that has a headphone jack.
Here's my Ipod working in Aux mode plugged into the headphone jack. You can switch back and forth between Aux and Ipod mode, so if for some reason you can't figure out why the Aux isn't working it's either you forgot to set up the dip switch or you forgot to change it to aux mode on the radio.

From there you can just re-assemble everything in reverse order. Don't forget where all the screws and bolts go or else you'll be doing this :argh:
Ipod in the car? Where?

Oh there it is. Out of sight out of mind. Now go play your favorite tunes :rock:

The Good
-Excellent sound quality
-Supports one auxillary device (most others do not) good if you own an external satellite radio or HD Radio.
-Displays Artist & Song Title Text
-Charges the Ipod (but not the auxillary device)
The Bad
-For some reason not all songs display their text. It will either display "No Text" or just the Track time and Track number (text will not display at all, only way to fix this is to turn the vehicle off and on again)
-The random function is confusing (I have problems skipping songs if I don't want to hear it. If I try to skip a song the ipod will go to the first song of the playlist.)
-Repeat function is not available
-Continues to charge after the vehicle is off, which could be unhealthy for the Ipod battery in the long run.
-Takes some getting used to, but everything has some kind of learning curve.
-If you remove the Ipod from the vehicle and put it back in it takes a couple of minutes to reconnect, the headunit will usually display Open CD or Aux 6-1 until it finishes connecting.
-Changing songs has a delay from when you press fast foward to when the song actually changes. It doesn't change songs quickly like a CD does which kind of sucks when you want to fast forward to a specific song.
Update: It seems USA Spec has or will discontinue the PA-12 and upgrade to the PA-15 and PA-20 unit. I think the only changes they made were to support toyotas with stock navigation units and newer model Toyotas
PA15 TOY – UPGRADE from the PA12 TOY. Displays song title & Artist info on all radios with “Text” button, Works with all radios, including in dash 6 Disc CD Changer. PA15 allows connection through XM or CDC port, works on all 1998-2008 RADIOS including 07/08 Tundra, and Avalon. Works on all new 07/08 Delphi radios !!! Works on newer NAV radios through the SAT port and works flawlessly on all the older GEN 4 Nav radios !! For all new GEN 5 Toyota/Lexus NAV RADIOS, please use the PA2O TOY. GEN 5 NAV radios can be identified by the ability to playback MP3 CD.
This installation was done on a 2007 Tacoma X-Runner with the factory 6 Disc in dash CD Player. These instructions may or may not work on other Toyota vehicles. Contact USA Spec to verify if this item will work with your current radio. These are general installation instructions for the Tacoma so it should work with other brands of Ipod adapters such as peripheral Ipod2Car, IPac, etc... (just verify that it is compatiable with the 05+ Tacoma)
Installation Time
45 minutes - 60 minutes
Difficulty
3 out of 10
Tools Needed
3/8" Extention
10mm Socket
3/8" Ratchet
Thin putty knife (or something thin/flat and wide)
Philips head screwdriver (if you are installing in the center console.)
Overview
USA Spec PA12 Toy allows you to connect your IPod to the factory radio giving you the best sound quality possible. Toss out your old FM modulators because this will blow you away. To answer your questions that most of the other's answered for me (thank you to stevenredx, hiflyer, iski, jacksonj for answering all my ?'s) the USA Spec will do the following
-Charges your Ipod (continues to charge after ignition is off and pauses the song, so it should shut off eventually)
-Controls your Ipod through the factory radio and steering wheel controls (very limited though)
-Displays Text to a certain extent (sometimes songs may not display text for unknown reasons)
-Allows you to connect 1 auxilary device (RCA connection)
-Put it in Hybrid mode allows you to play Playlists or select songs on the Ipod like normal.
http://www.xr-underground.com/vb3/showthread.php?t=5002 My original thread asking ?'s
Some other useful information
- Dipswitch 1 On = Aux Enabled (Off = Aux Disabled)
- Dipswitch 2 On = Hybrid Mode (Off = Direct Mode)
- Dipswitch 3 & 4 should remain on
-The PA12 supports up to 5 playlists, the 6 spot is set for Aux.
-Playlists must be labled Toyota1 - Toyota5 (i.e Toyota1-MyFavorites)
-Playlists will show up like a CD changer and you change it like you would change a CD.
-Text will only display a certain number of characters (12 - 15), press the text button to switch between artist and song title. If your text is too long for the screen to display hold the text button down for 2 seconds and you will hear a beep. The headunit will display the remaining characters. Hold the text button down for 2 seconds and it will switch to the first half of the text.
Repeat is not supported
Toyota service manual on how to disassemble your center console / shifter area for both Manual and Auto transmission.
http://www.ncttora.com/fsm/05+/data/ileaf/06toyrm/06toypdf/06rmsrc/rm2006ta/06000.pdf
On to the write up
Here it is in all it's glory, the USA Spec PA12-Toy Adapter. I ordered off of Ebay for $149 + Tax(since I live in CA) with free shipping. It can be purchased through Crutchfield and some electronics stores. Sorry I didn't take a picture of all the wires and such but it should come with
-1 USA Spec PA12 Adapter
-1 IPod Connection Cable
-1 CD Changer Cable
-1 CD Changer Y Cable Adapter
-1 Bag of self tapping screws
-Instructions and other misc papers.
First step is to remove all CDs from the CD changer (instructions specify since you may be disconnecting the power from the changer and it could screw something up when you plug it back in.)
You should cover up the shifter area with a large soft towel to prevent scratching of the plastic console. You don't need to but keep in mind the plastic scratches up very easily.
Next you will need to remove the A/C controls. This is where you need the thin flat putty knife (or similar thin and wide is best). I masked off the area underneath to prevent any scratching, again you don't need to but don't say I didn't warn you.
Take your putty knife and slide it on one end of the A/C control and carefully pry it off, once you pop one end off work on the opposite side. It came off very easily for me so don't use too much force.
Becareful not to stick the putty knife too far in or you might break something.
Once you pop the plate off you will see two wiring harnesses behind it, unplug the two harnesses and set the A/C Controls aside.
Behind the A/C Controls you will see 4 10mm bolts. Simply remove them with the 10mm socket (you may need the ratchet extension)
Once all four bolts have been removed you can remove the radio. It is still being held in place by 3 clips at the very top of the radio. For this you need to pull the radio straight back toward the rear of the cab carefully and it should pop right out.
There are a lot of wiring harnesses behind it connected to the radio. Now depending on what kind of install you want to do (Hidden in the glove box, hidden in the center console or exposed) you might need more space to work. I disconnected all the harnesses and put the radio aside so I could work better.
I chose to hide the adapter under the cupholder and feed the ipod cable through to the center console box. If you choose to stash it in the glove box or someplace else then you can skip these next few steps but you'd need to figure out how to get the cables through and a place to stash the adapter.
Remove the cup holder by lifting it straight up. There are 4 plastic clips around the cup holder that hold it in place so becareful not to break them. It should pop off easily.
Remove the carpet from the center console box and expose the 2 x 10mm bolts.
Remove the 2 x 10mm bolts and store them safely
Remove the 4 philips head screws from under the cupholde, there are 4 but I only circled two.
For this step you can undo the center console and just lean it back since you will just be running the cables through. There are 2 hooks on each side just undo it, lift up, and pull the console off.
Unscrew the shift knob, put it in 4th gear, and pull the gear box/boot off by pulling it straight back towards the rear of the cab. There are 3 clips holding it in place.
Now that you've gotten the whole center console apart you can start installing the Ipod adapter.
I fed the CD Changer cable through the dashboard to reveal it at the bottom where the gear box cover was. It was rather difficult but I found that if you feed the round connecter from the top and use your other hand to receive at the bottom while pushing the plastic foward to make room for the cable, it will feed through easier.
I'm sorry I can't really explain it in detail better because once you get in there it might make a little more sense. But here are the end results.
Now that you have the cables fed through the rest is pretty much plugging it together. I ran the cable through the center around the shifter and connected it to the Ipod adapter box. You don't need to screw the adapter down, I just tucked it underneath that little piece of carpet and I've never heard it slide or rattle.
Plug the Y-Cable into the upper end of the CD Changer cable (the square connecter) and plug the male end of the y connector into the back of your radio.
After you've got that part installed you can connect the rest of the cables back together and reinstall the radio. Just make sure you connect everything back, I forgot to plug the steering wheel controls and I had to take everything apart again.
Just plug the all the harnesses in and put the radio back in. Don't bolt it back up yet because if the Ipod adapter doesn't work you may need to fiddle with the connectors.
Don't finalize the install yet. Connect the ipod cable into the USA Spec adapter and test things out first to make sure everything works. Hopefully everything works without any problems.
Viola a fully working Ipod on the stock Toyota radio. Displays the text, charges, and pretty much anything else you can think of.
Now that I know everything works I finished everything up. I took the small connector off that goes into the USA Spec adapter and fed it through one of the small holes at the bottom of the center console and wired it up. I also got an RCA to headphone jack cable and wired it up, now I can connect any media device that has a headphone jack.
Here's my Ipod working in Aux mode plugged into the headphone jack. You can switch back and forth between Aux and Ipod mode, so if for some reason you can't figure out why the Aux isn't working it's either you forgot to set up the dip switch or you forgot to change it to aux mode on the radio.
From there you can just re-assemble everything in reverse order. Don't forget where all the screws and bolts go or else you'll be doing this :argh:
Ipod in the car? Where?
Oh there it is. Out of sight out of mind. Now go play your favorite tunes :rock:
The Good
-Excellent sound quality
-Supports one auxillary device (most others do not) good if you own an external satellite radio or HD Radio.
-Displays Artist & Song Title Text
-Charges the Ipod (but not the auxillary device)
The Bad
-For some reason not all songs display their text. It will either display "No Text" or just the Track time and Track number (text will not display at all, only way to fix this is to turn the vehicle off and on again)
-The random function is confusing (I have problems skipping songs if I don't want to hear it. If I try to skip a song the ipod will go to the first song of the playlist.)
-Repeat function is not available
-Continues to charge after the vehicle is off, which could be unhealthy for the Ipod battery in the long run.
-Takes some getting used to, but everything has some kind of learning curve.
-If you remove the Ipod from the vehicle and put it back in it takes a couple of minutes to reconnect, the headunit will usually display Open CD or Aux 6-1 until it finishes connecting.
-Changing songs has a delay from when you press fast foward to when the song actually changes. It doesn't change songs quickly like a CD does which kind of sucks when you want to fast forward to a specific song.
Update: It seems USA Spec has or will discontinue the PA-12 and upgrade to the PA-15 and PA-20 unit. I think the only changes they made were to support toyotas with stock navigation units and newer model Toyotas
PA15 TOY – UPGRADE from the PA12 TOY. Displays song title & Artist info on all radios with “Text” button, Works with all radios, including in dash 6 Disc CD Changer. PA15 allows connection through XM or CDC port, works on all 1998-2008 RADIOS including 07/08 Tundra, and Avalon. Works on all new 07/08 Delphi radios !!! Works on newer NAV radios through the SAT port and works flawlessly on all the older GEN 4 Nav radios !! For all new GEN 5 Toyota/Lexus NAV RADIOS, please use the PA2O TOY. GEN 5 NAV radios can be identified by the ability to playback MP3 CD.
New !!! Displays Text on all Radios with a Text Title Button !!
PA15 TOY on GEN 4 Toyota/Lexus Nav radio connected to CD Changer Port.
PA 20 TOY – Recommended for TOYOTA/LEXUS vehicles with FACTORY NAV radios THAT HAVE MP3 CD CAPIBILITY. Click on the above links for more info! On screen Song Title, Artist and song selection from Menu on all Factory Toyota and Lexus vehicles with NAV. Full on screen Menu control on all new GEN 5 NAV RADIOS that have MP3 CD capability! Complete control with all iPods including iPhone, iTouch, ClassicPA15 TOY on GEN 4 Toyota/Lexus Nav radio connected to CD Changer Port.
Last edited: